Microsoft Entra ID Configuration: A Step-by-Step Comprehensive Guide to Streamlined Identity Management

Microsoft Entra ID offers powerful features to enhance organizational security posture, reduce risk, and improve compliance. This report explores three key aspects: Access Reviews, Admin Units, and Privileged Identity Management (PIM). I am pleased to provide a detailed report on how to utilize these powerful features in the Microsoft Entra ID Admin Center. I will explore their benefits, configurations, and best practices to maximize Entra ID’s potential.
Access Reviews
Microsoft Entra ID’s access reviews help organizations manage user access to groups, applications, and roles. Regular reviews ensure only the right people have access.
Key scenarios for access reviews:
- Too many users in privileged roles: Review and recertify role assignments.
- Dynamic membership limitations: Create reviews for groups where automation isn’t possible.
- Group purpose changes: Review membership before using a group for a new purpose.
- Business-critical data access: Regularly reconfirm access and justify continued access.
- Policy exception management: Review and manage exceptions to access policies.
- Guest access: Confirm legitimate business needs for guest access.
- Recurring reviews: Set up periodic reviews with notifications and smart recommendations.
By using access reviews, organizations can efficiently manage user access, reduce risk, and improve compliance.
Benefit Of Access Reviews
- Reduced risk: Regular access reviews are important for reducing security risks, identifying unused accounts, and ensuring that only authorized individuals have access. Employees who have changed roles would no longer have access to areas they shouldn't, ensuring that former employees are completely removed from the organization.
- improved compliance: Access reviews in Entrada ID improved compliance by ensuring accurate access, removing unnecessary permissions, enforcing role-based access, and providing continuous monitoring and audit trails, thereby minimizing risks, protecting data, and adhering to regulatory requirements
- Enhanced security: Access reviews enhanced security by removing unnecessary access, detecting and revoking unused permissions, preventing lateral movement and privilege escalation, identifying and mitigating insider threats, and reducing attack surface and vulnerabilities, ultimately minimizing risk and protecting sensitive data.
Configuration of Access Review Part 1
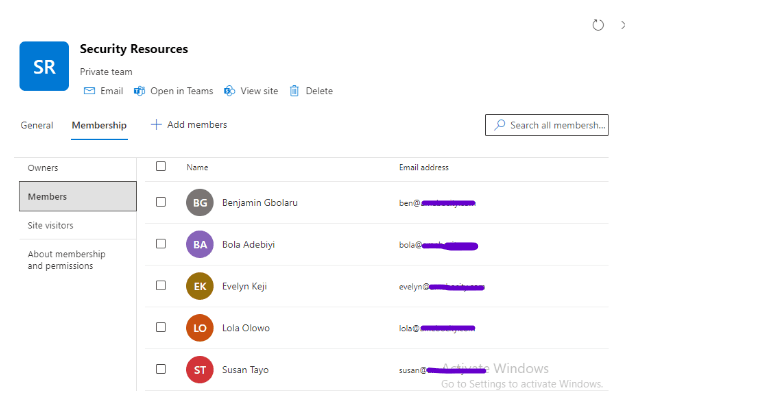
To configure access reviews, you need to create access review policies, specify reviewers, and set frequencies. Using the following scenario, I will demonstrate how to achieve this: An IT Security Manager at a large organization wants to ensure that only active and authorized members of the ‘Security Resources’ group have access to sensitive security resources. To achieve this, the manager decides to conduct a regular Access Review for the ‘Security Resources’ group, which consists of five members: Benjamin, Susan, Evelyn, Bola, and Lola.
This is a screenshot showing the members of the Security Resources Group.
Below is the step-by-step guide I followed with screenshots to configure access reviews using the scenario.
Step 1: Navigating to Access Review I logged in to the Microsoft Entra ID Admin Center, navigated to Identity Governance, and clicked on Access Reviews. Then, I clicked on ‘New access review’.
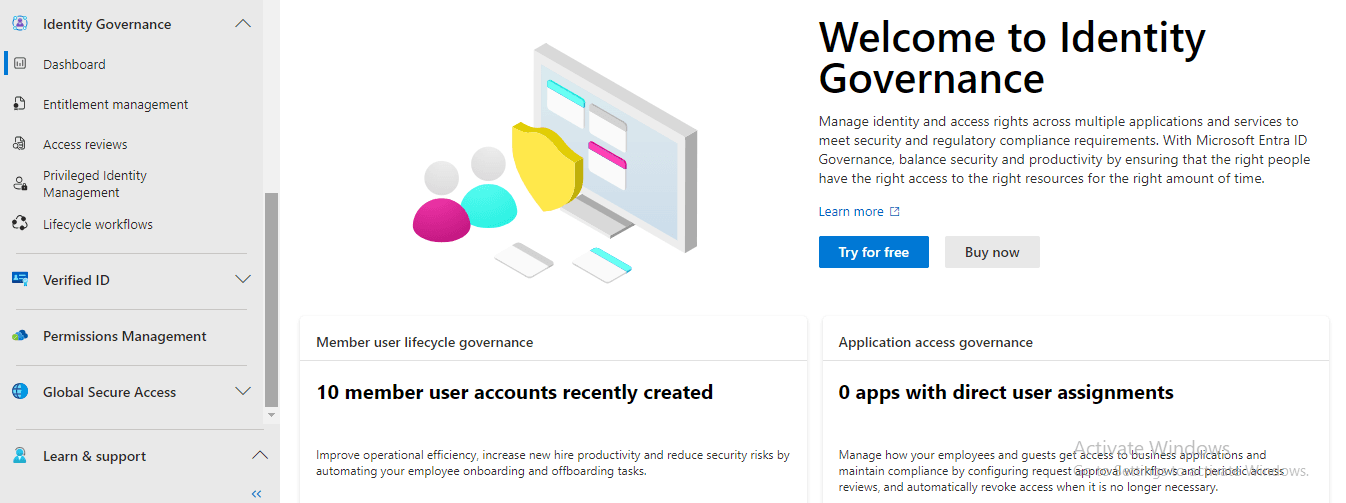
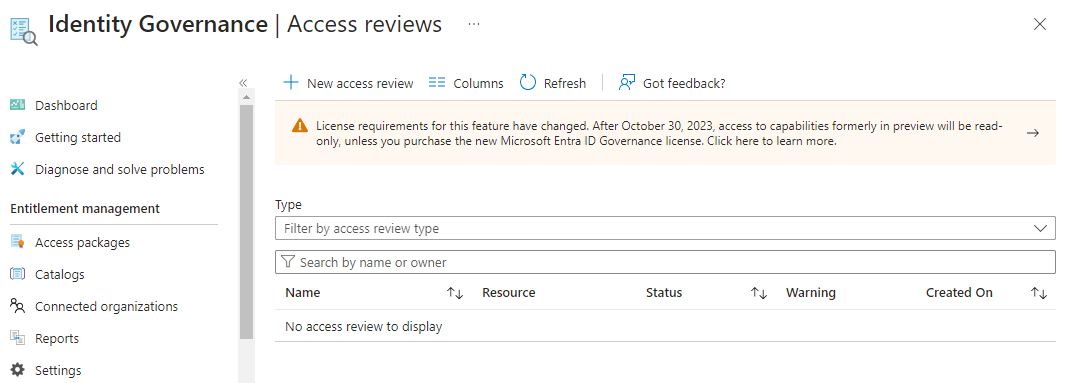
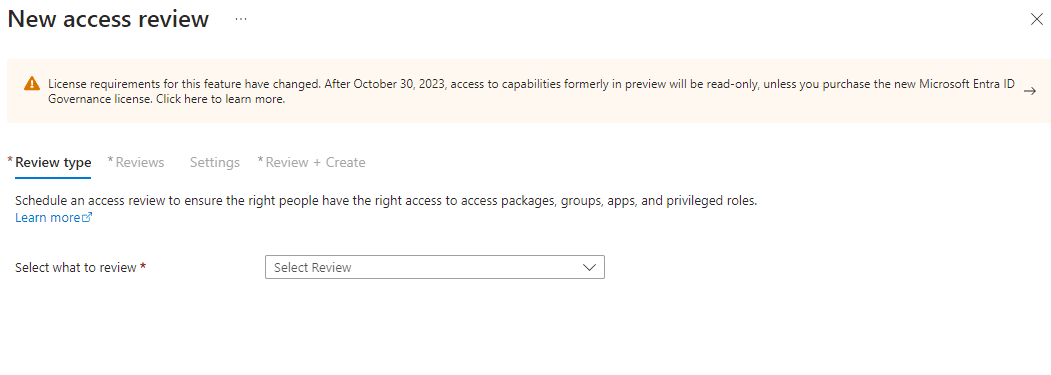
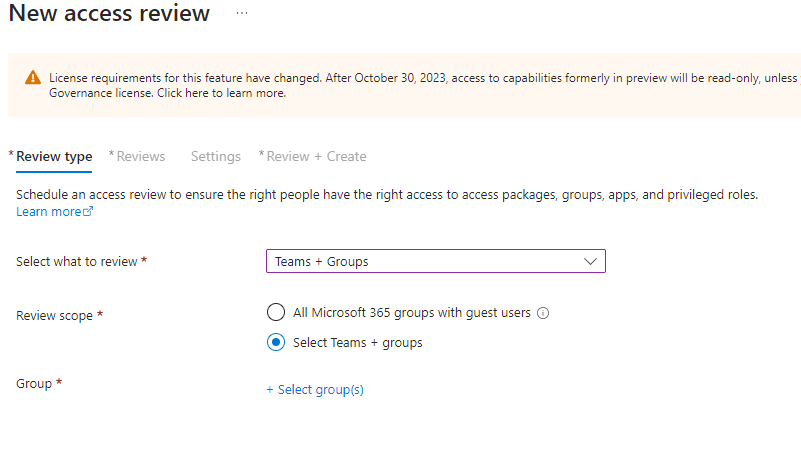
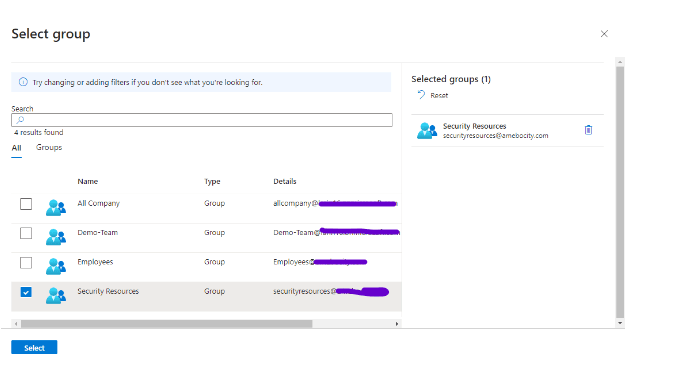
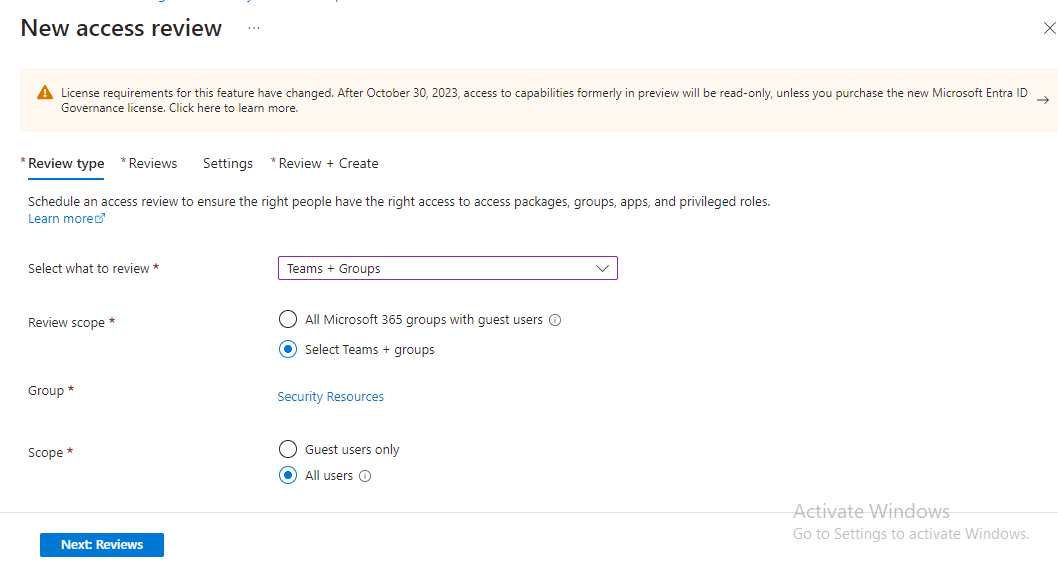
Step 2: Choosing Review Type and Scope I selected ‘Groups + Teams’ as the review type. I also selected ‘Select Teams + groups’ as the review scope and chose ‘Security Resources’. Then, I clicked ‘Select’. Next, I chose the scope as ‘All Users’ and clicked the ‘Next Review’ button to proceed to the next page.
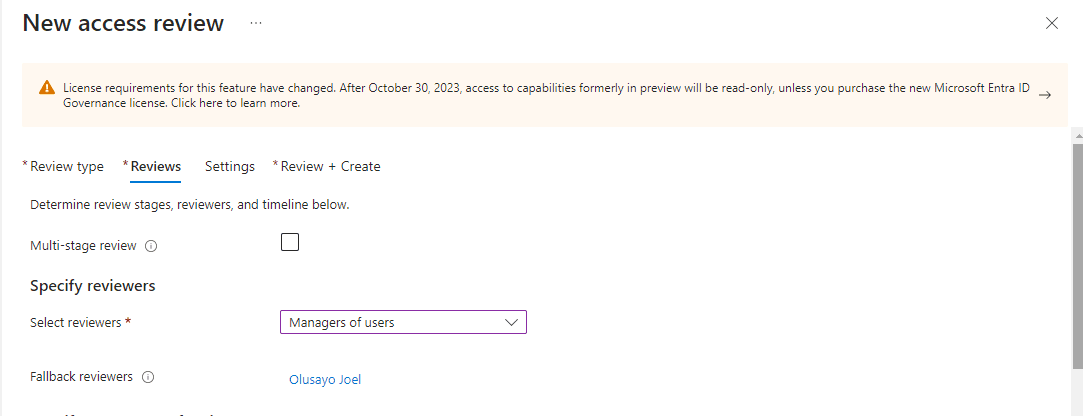
Step 3: Defining Review Settings Under ‘Specify reviewers’, I selected ‘Manager of users’ as the primary reviewer, which is the IT Security Manager. Additionally, I selected Olusayo Joel, the Assistant IT Security Manager, as the fallback reviewer in case the primary manager is unavailable or on leave.
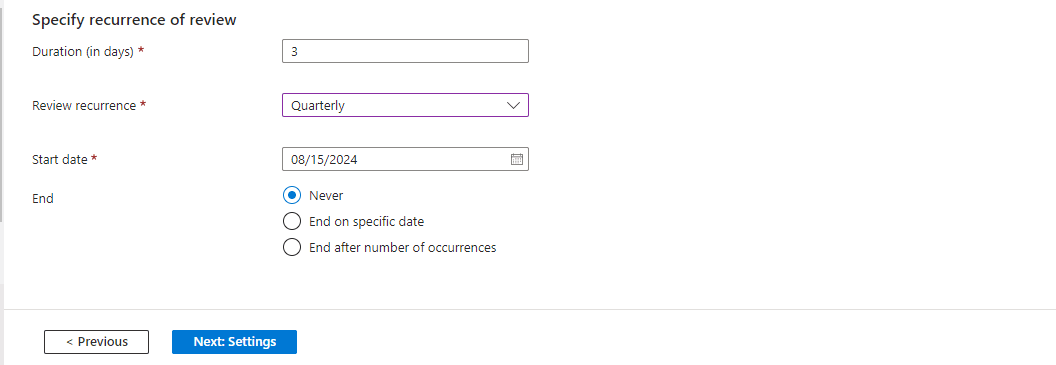
Under ‘Specify recurrence of review’, I entered 3 as the ‘Duration (in days)’, indicating the time period available to complete the access review. I also selected ‘Quarterly’ as the review recurrence to ensure that only authorized individuals have access to the Security Resources group. Furthermore, I set August 15, 2024, as the ‘Start Date’ and checked the ‘Never’ button as the end option, implying that the access review will continue to occur every quarter indefinitely.
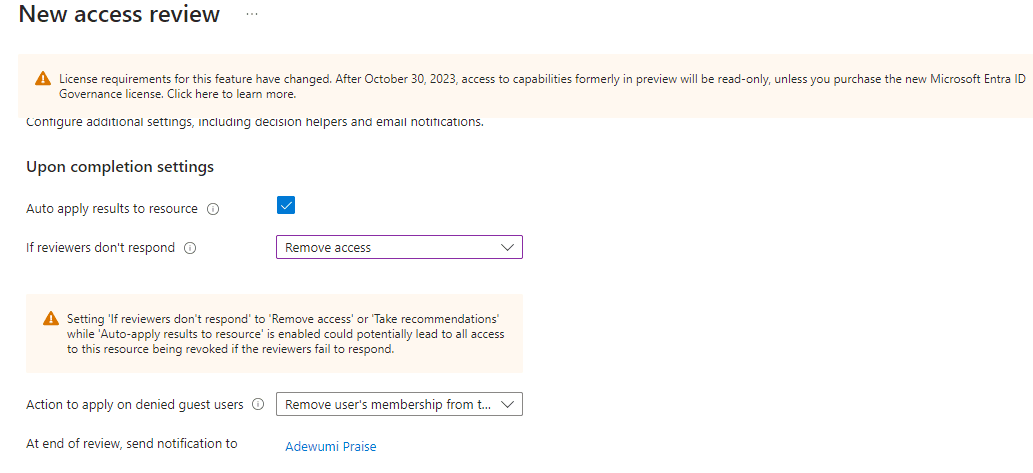
Under ‘Upon completion settings’, I checked the box for ‘Auto apply results to resource’. This means that if any user’s access is denied, their access to the resources will be removed automatically after the review is completed. I also selected ‘Remove Access’ as the action to take if reviewers don’t respond.
Additionally, I chose Adewumi Praise, the IT Manager, to receive notifications at the end of the review.
I checked the box for ‘No sign-in within 30 days’, as this is a crucial security consideration. If someone hasn’t signed in for 30 days, it poses a security risk that requires investigation.
I did not check the ‘User-to-Group Affiliation’ box, as it is not necessary for users to interact with each other to perform their duties.

Step 4: Configure Advanced Settings Under Advanced Settings, I checked the box for ‘Justification required’ to ensure that reviewers provide a justification for their decisions when denying or approving a user’s access.
I also checked the box for ‘Email Notification’ to enable Azure AD to send emails to reviewers when an access review starts, and to the review owner when a review is completed.
Furthermore, I checked the box for ‘Reminders’, which means that Azure AD will send reminder emails to all reviewers at the midpoint of the review period for in-progress access reviews.

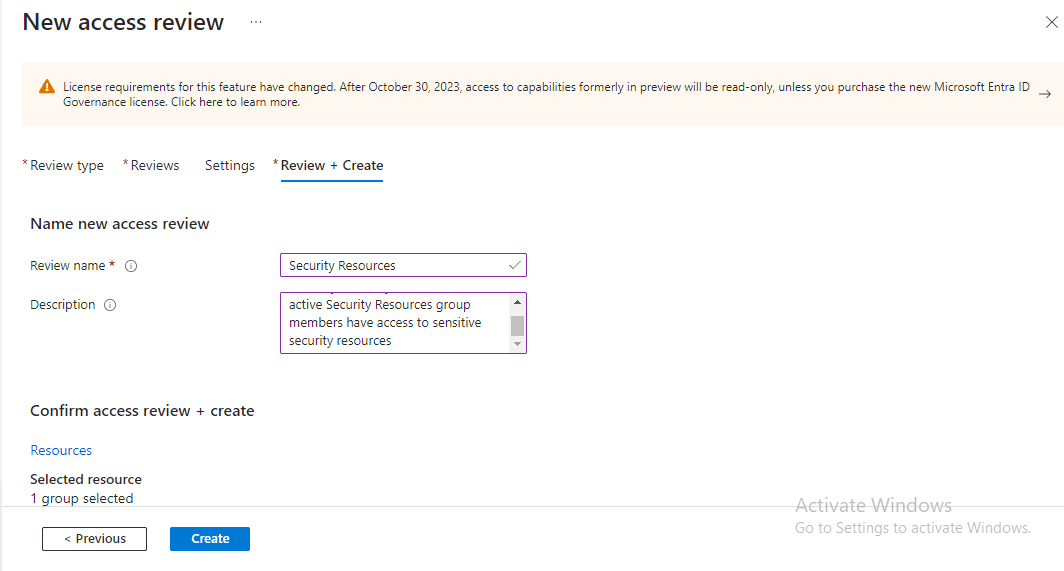
Step 5: Review and Create Policy Under ‘Review + Create’, I named the new Access Review as ‘Security Resources’ and entered a description. Then, I clicked on ‘Create’, initiating the commencement of reviewing users in the Security Resources group membership.
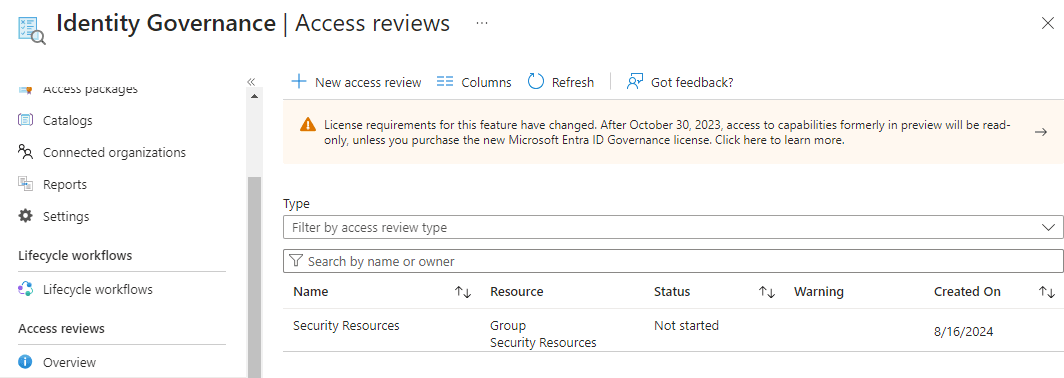
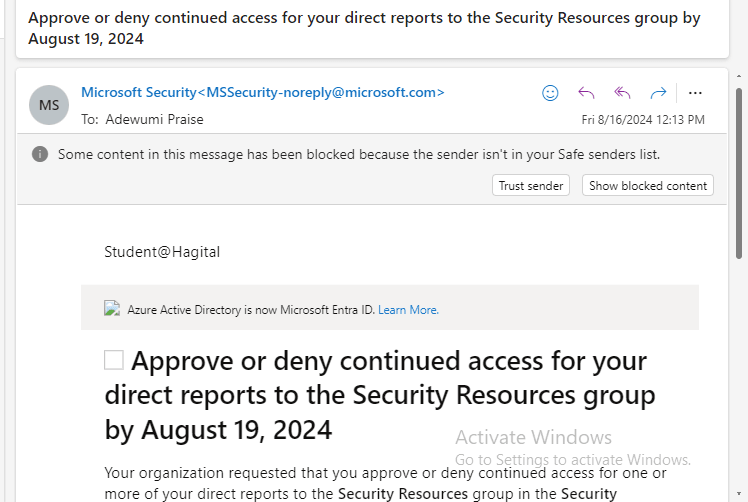
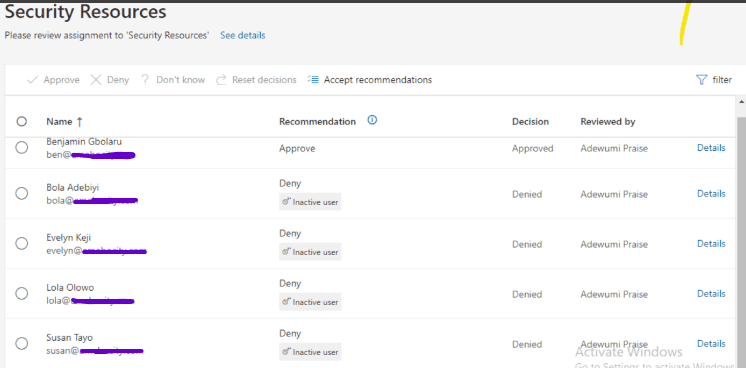
Step 6: Access Review Initiation To see how the review works, the manager of the users needs to log in to their Outlook email account (or log in to myaccess.microsoft.com) to commence the review. An email will appear in their inbox, and they should click the “Start Review” button to be redirected to ‘My Access’, where they will be prompted to approve or deny access to the members of the Security Resources group, as shown in the screenshot below.
That is exactly what I did, as I used Adewumi Praise’s account, the IT Security Manager, to implement the process. I logged in to his Outlook email account, clicked on the “Start Review” button, and followed the prompts to review and manage access to the Security Resources group.

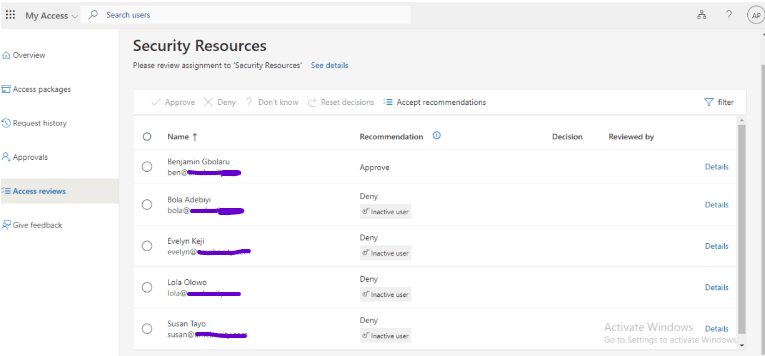
From the screenshot above, notice that only Benjamin Gbolaru is deserving of being approved, while others like Bola, Evelyn, Lola, and Susan are recommended to be denied due to their inactivity. The reason for this may be that they have been transferred to another department within the organization. Therefore, I will follow the recommendation.
Please note, as you read my report, that the example I’m using is purely hypothetical and for illustrative purposes only.
So, I approved only Benjamin with the reason that he is active in the group and still remains in the Security department within the organization. Meanwhile, I denied the rest (Bola, Evelyn, Lola, and Susan) with the reason that they have been transferred to another department within the organization, which is why they are no longer active in the group.
The screenshot below shows the Access Review details and illustrates how all the denied users were automatically removed from the Security Resources Group.
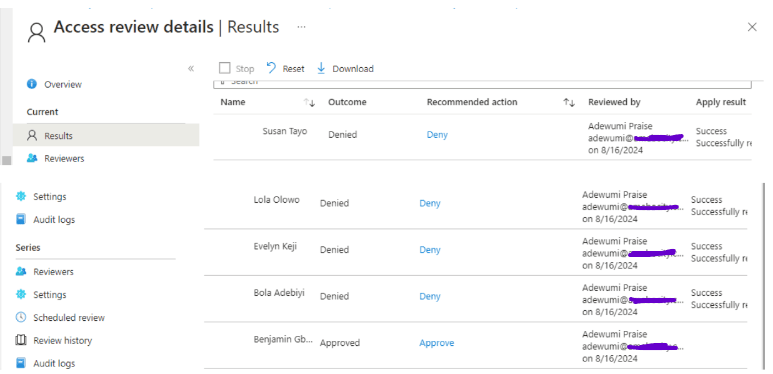
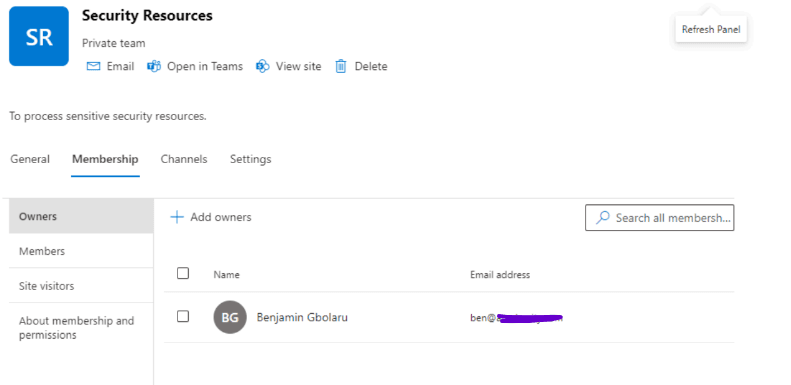
From the screenshot, you can see that only Benjamin remains in the group.
By following the 6 steps outlined above, I have successfully configured access reviews for Teams and Groups, ensuring regular verification of access privileges and maintaining a secure environment within the organization.
Configuration Of Access Review Part 2
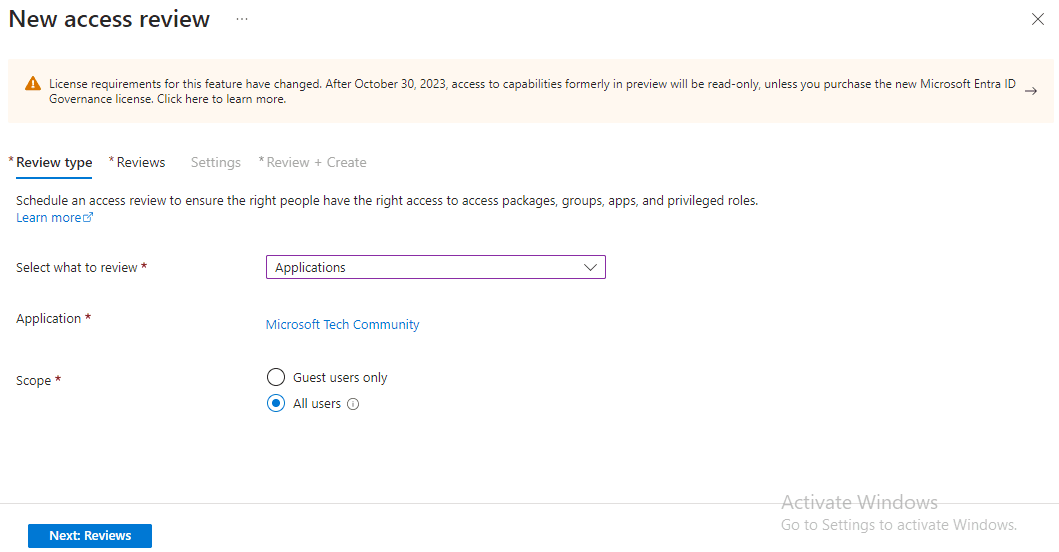
Access Review configuration is not limited to just Teams and Groups; it can also be applied to Applications. Let me show you how it can be done step by step with screenshots. To illustrate this, let’s imagine another scenario where the Microsoft Tech Community application requires regular access reviews to ensure that only active employees who are part of the Tech Community team have access.
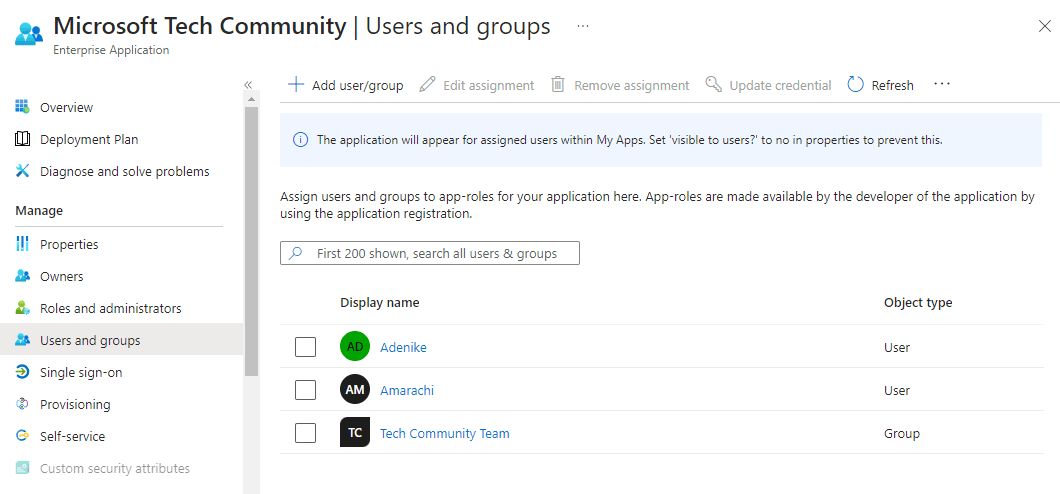
To implement the scenario, I have completed some prerequisites by adding the Tech Community Team’s Group and two users outside of the group, Adenike and Amarachi, to the Microsoft Tech Community Application. I also checked using my account to see if I have access to the newly added app.
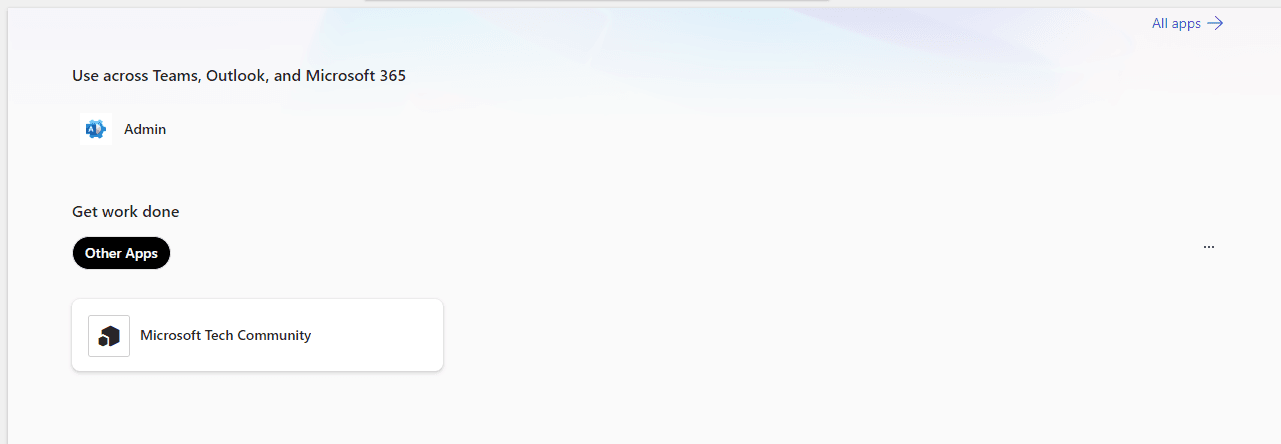
Steps:
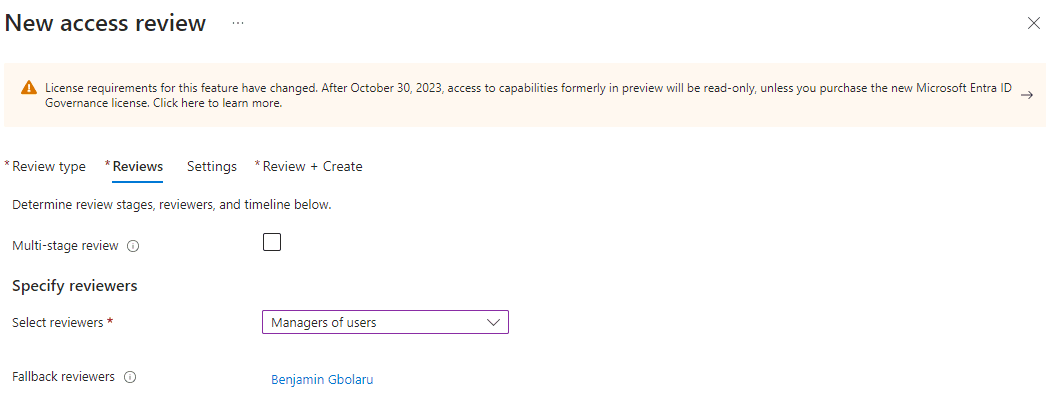
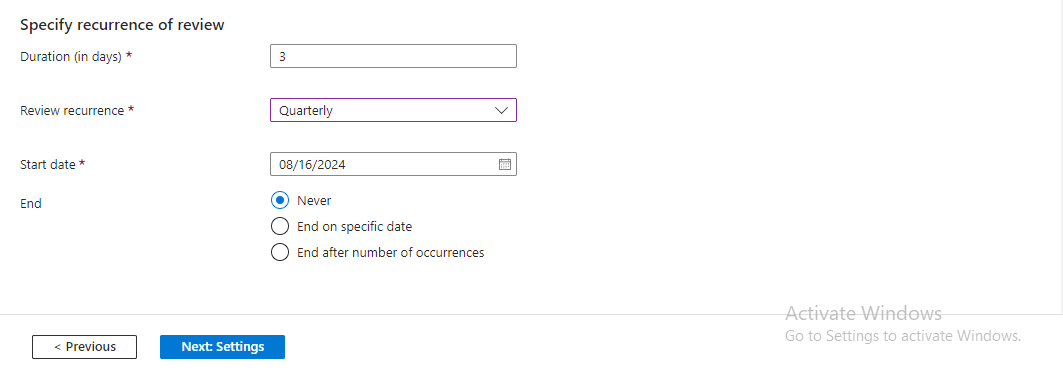
- I log in to the Access Review dashboard, select the Microsoft Tech Community application, and go through the same process for Access Review that I used for Teams and Groups, which will be represented by the following screenshots.
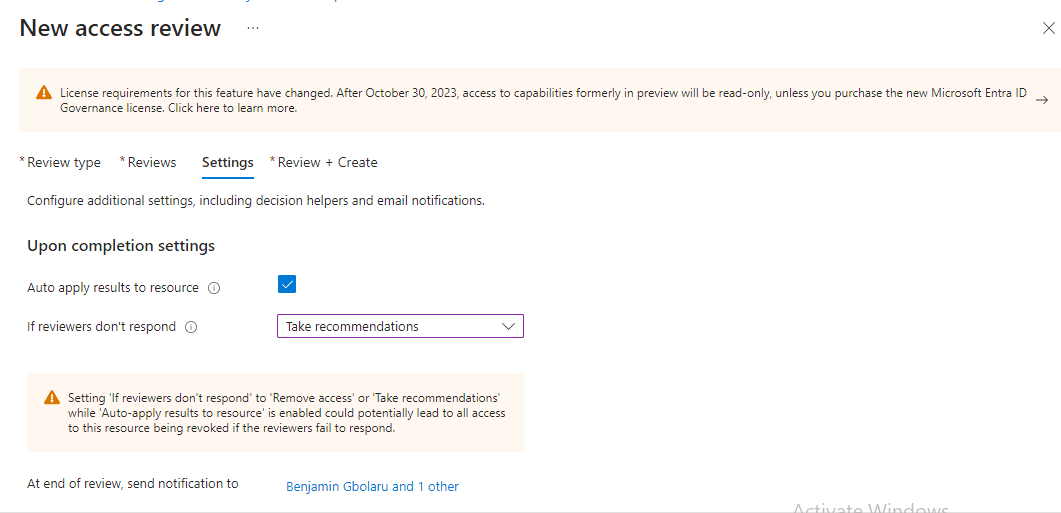
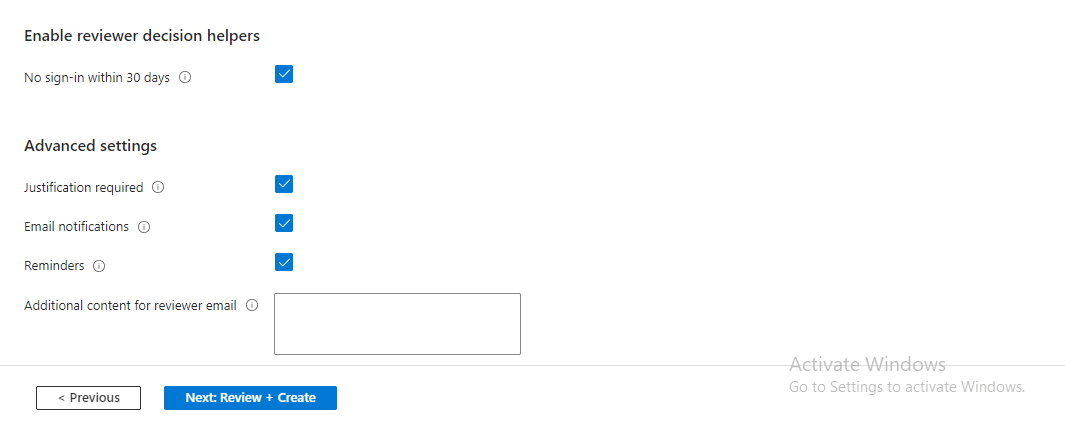
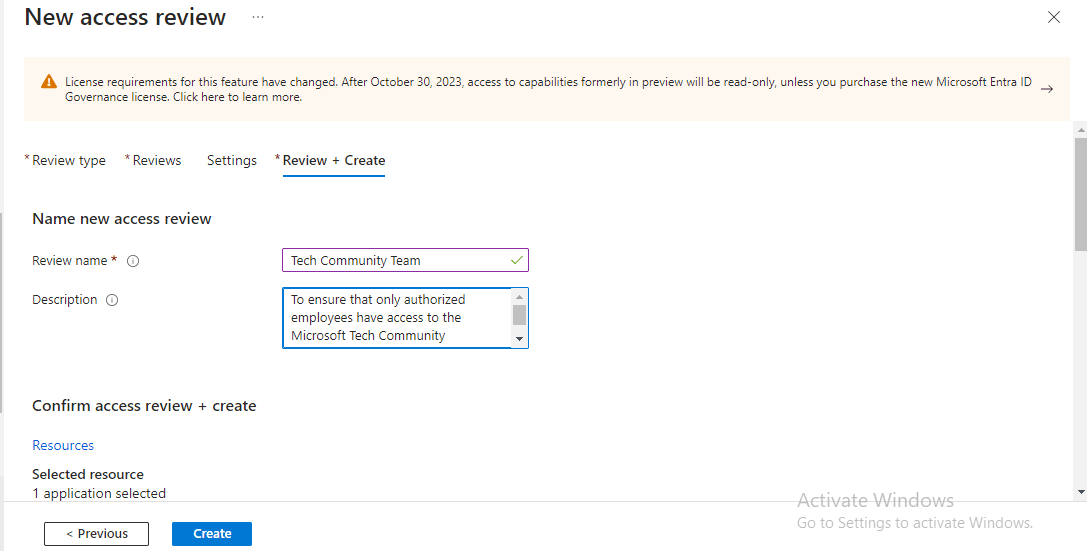
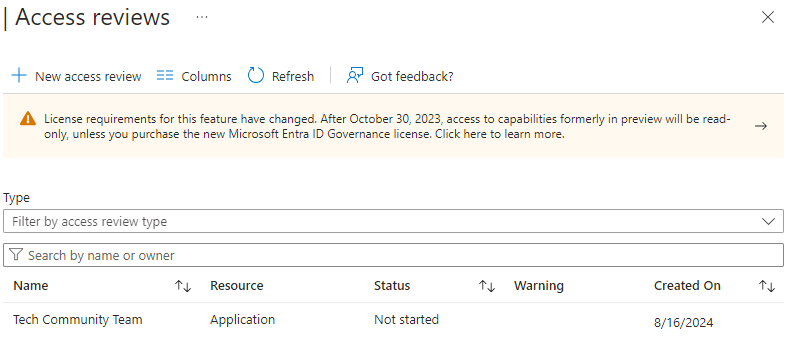
- I click on “Start Review” to begin the review process after receiving an email in my Outlook email account, which requests me to approve or deny users’ continued access to the Microsoft Tech Community application within the Tech Community Team Group.
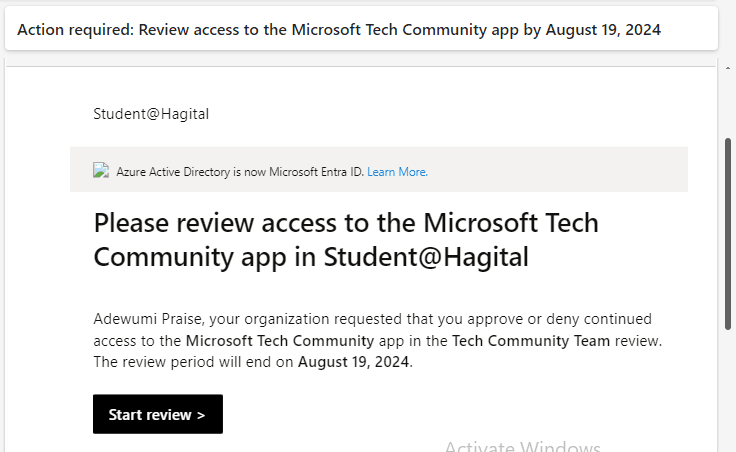
- I review the list of users with access to the application and select “Approve” for active employees who are part of the Tech Community team.
- I select “Deny” for employees who have left the Tech Community team or are no longer active.
- I add a reason for denying access, such as “Employee has left the Tech Community team.”
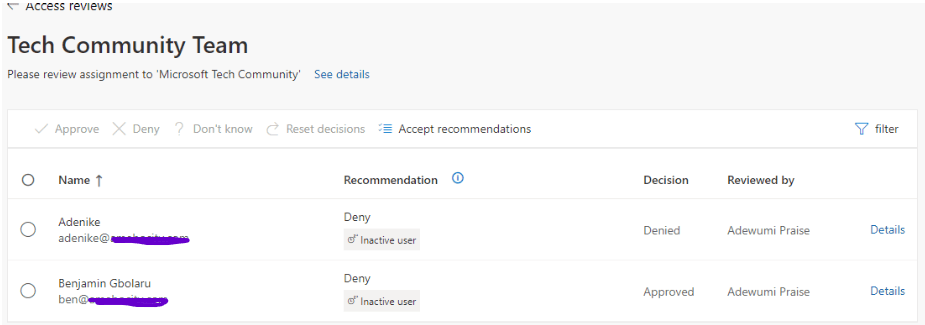
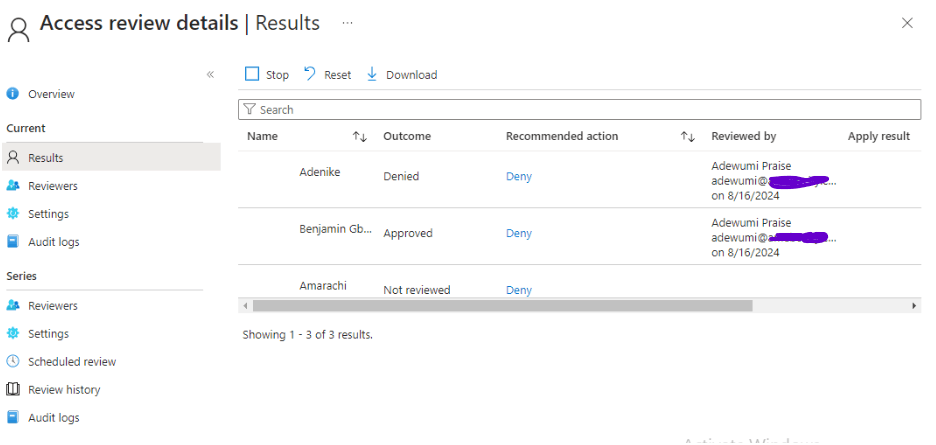
From the screenshot above, you will notice that Amarachi’s manager has not yet reviewed her access, and this can be done before the 3-day deadline elapses.
The Access Review for the Microsoft Tech Community application ensures that only authorized employees have access to sensitive information and resources, reducing the risk of unauthorized access and maintaining a secure environment within the organization.
Best Practices for Effective Access Reviews
Here are the top 10 best practices for effective access reviews, most of which I also use when configuring access reviews.
- Review Access Regularly: Check who has access to sensitive information and systems often.
- Define Clear Policies: Establish rules for access reviews and communicate them to everyone.
- Choose the Right Reviewers: Select trusted people to review access, like managers or security teams.
- Document Everything: Keep records of access reviews, decisions, and changes.
- Automate When Possible: Use tools to streamline access reviews and reduce manual work.
- Communicate with Stakeholders: Inform users, managers, and reviewers about access review processes.
- Continuously Monitor: Regularly check for access changes and updates.
- Train Reviewers: Educate reviewers on access review processes and security best practices.
- Address Exceptions: Handle unusual access requests or exceptions promptly.
- Improve Processes: Regularly assess and enhance access review procedures.
By following these best practices, organizations can ensure effective access reviews, maintaining security and compliance.
I have successfully described the benefits of Access Review, configured Access Review, and outlined best practices for effective Access Review.
Administrative Unit
An Administrative Unit in Microsoft Entra ID is a logical grouping of resources and users within an organization, used to delegate administration and manage access control.
Administrative Units delegate some of the power of Global Administrators for efficient management within an organization, especially if the organization is a global company with offices in every part of the world and thousands of users. Since Microsoft recommends a maximum of five Global Administrators, it would be challenging for them to manage numerous users alone, so there is a need to delegate their power.
Benefits of Admin Units
Administrative Units are crucial for the efficient, secure, and compliant management of resources and access within an organization. Below are the seven benefits of Administrative Units in an organization:
- Scoped Administration: Admin Units enable administrators to manage specific subsets of users and resources, reducing the risk of unintended changes.
- Role-Based Access Control: Admin Units support role-based access control, ensuring users only have access to necessary resources.
- Delegation: Admin Units allow delegation of administrative tasks to specific administrators, improving efficiency.
- Organization: Admin Units help organize resources and users, simplifying management.
- Security: Admin Units enhance security by limiting access and reducing the attack surface.
- Compliance: Admin Units support compliance by enabling segregation of duties and access control.
- Flexibility: Admin Units adapt to changing organizational structures and needs.
Configuration of Admin Units
Using a scenario where BenTech Ltd., a global company, wants to delegate administration of their African offices’ resources and access to a regional IT team. To achieve this, they need to create an Administrative Unit to manage users, groups, and resources specific to the African region. Here are the steps to implement this scenario in Administrative Units in Microsoft Entra ID:
Steps:
- I signed in to Microsoft Entra ID (Azure AD) as a Global Administrator.
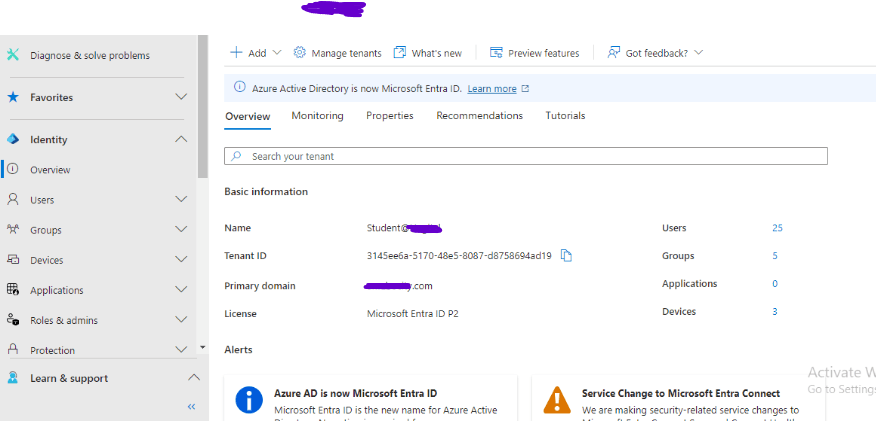
- I navigated to “Administrative Units” and clicked “Add” in order to create a new administrative unit.

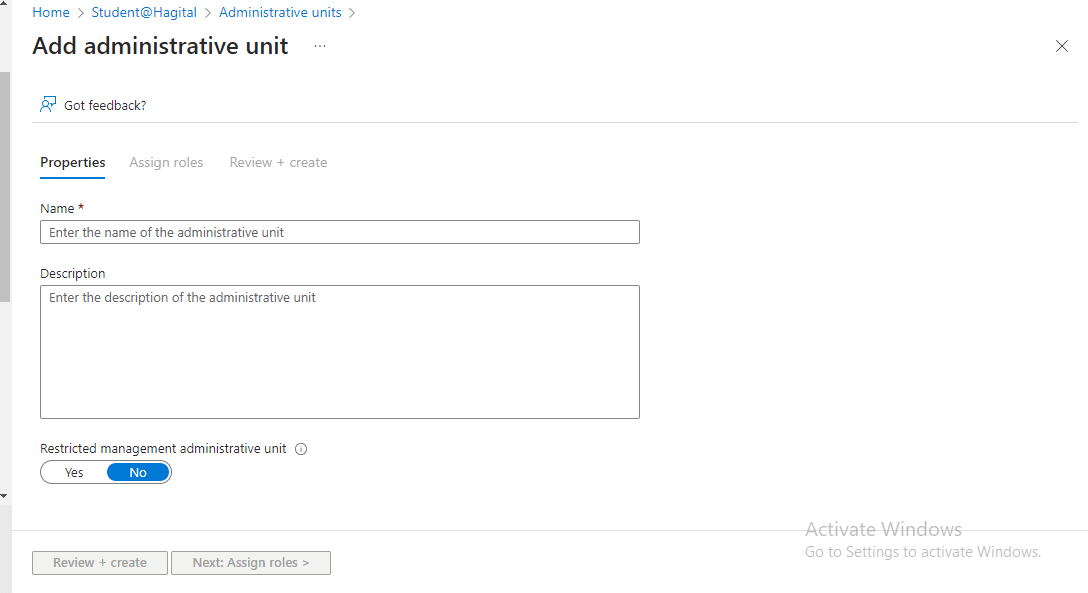
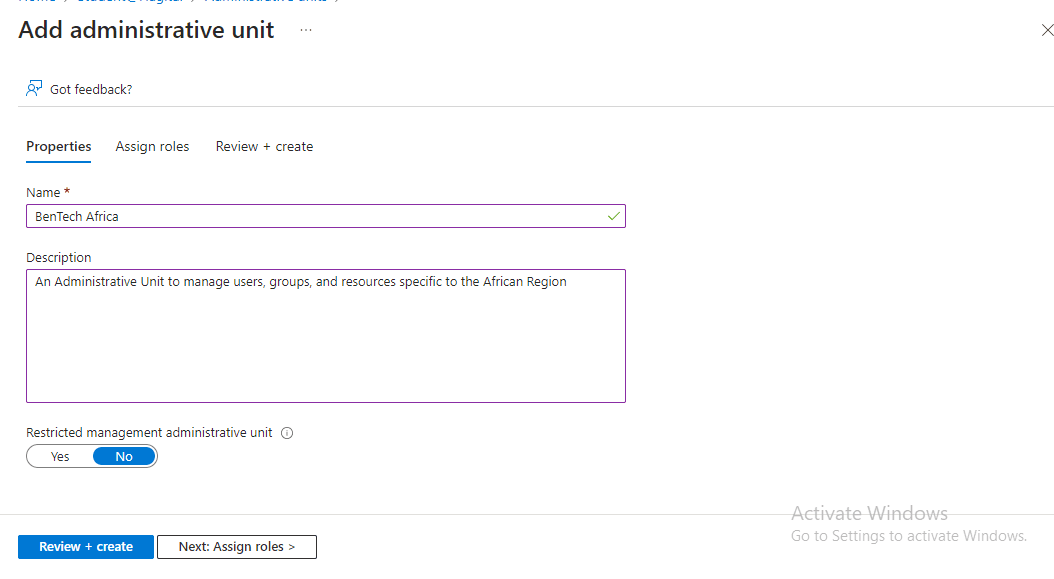
- I named the unit “BenTech Africa” and added a description. I also ensured that the “Restricted management administrative unit” option was set to “No” for the administrative unit, allowing delegated users to perform their administrative tasks.
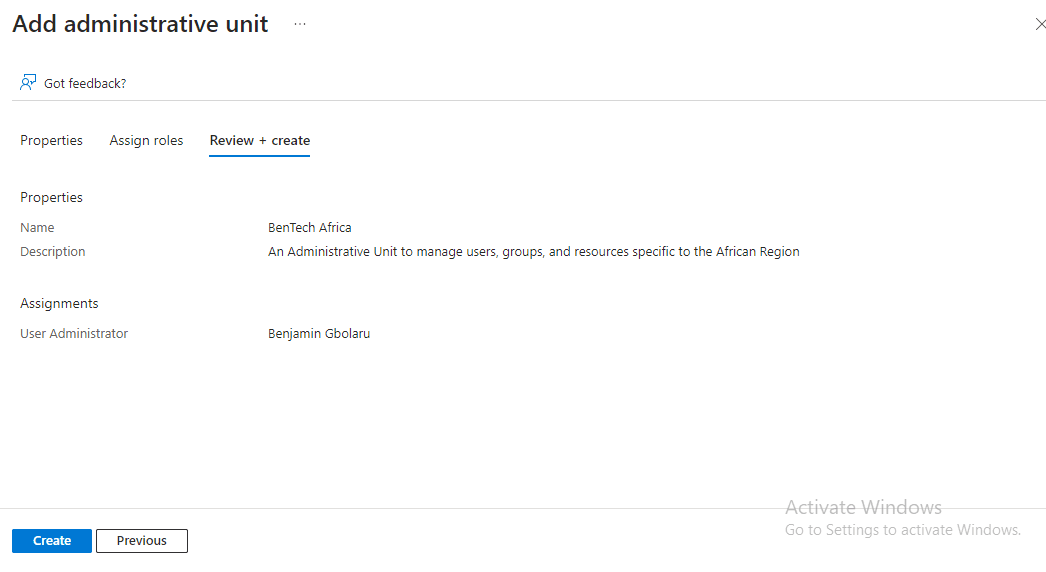
- I assigned the User Administrator role to the new Admin Unit for Benjamin Gbolaru (myself). After that, I clicked on the create button.

- After the BenTech Africa Admin Unit was successfully created, I then added four members to the Admin Unit.
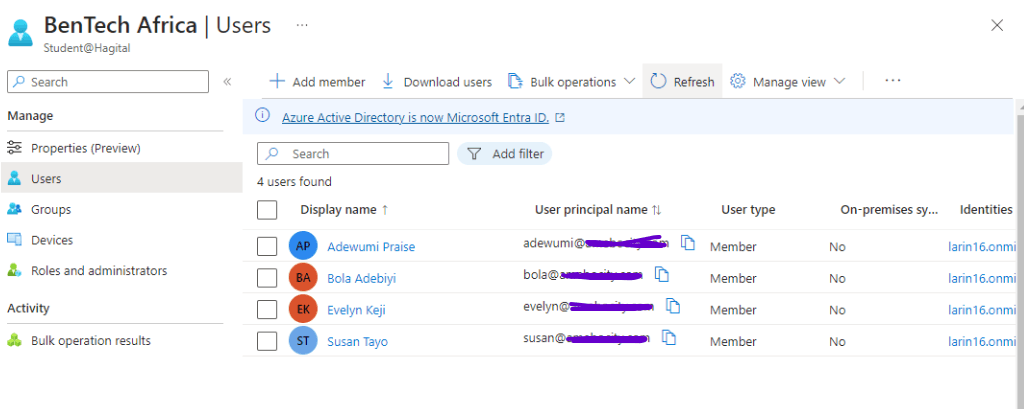
Whenever these members have issues, there won’t be any need to disturb the Global Administrator to resolve them; rather, the person with the User Administrator role in the BenTech Africa office will be the one to solve them.
- After removing myself as the User Administrator, I assigned Bola Adebiyi, a member of the BenTech Africa Admin Unit and IT Team Leader for BenTech Africa, as the new User Administrator.

As shown in the screenshot above, you will notice that the scope is tied to the BenTech Africa Admin Unit, rather than the Directory (Tenant) level.
- Verifying if Bola Adebiyi, with the User Administrator role, has access to only the BenTech Africa Admin Unit.
From the screenshot below, you will notice that Bola Adebiyi has access to only the users in the BenTech Africa Admin Unit, enabling him to perform his administrative role without access to the entire BenTech organization. This is why he cannot add members, as the option is greyed out. If there is a need for another user to join the BenTech Africa Admin Unit, the Global Admin will add the user. However, any other tasks involving the management of these users within the BenTech Africa Admin Unit will be handled by Bola Adebiyi, the IT Leader in BenTech Africa.
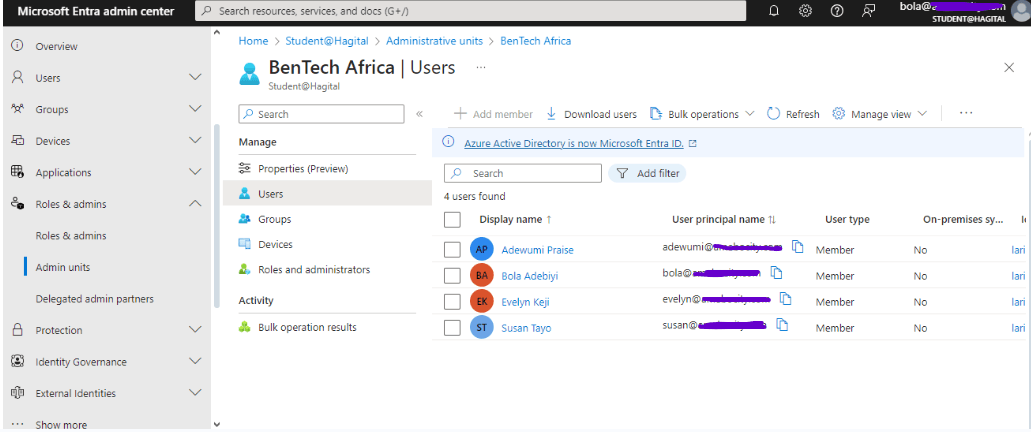
From the steps above, I have successfully configured an Admin Unit. Additionally, I have demonstrated, through a practical scenario, the importance of Admin Units for a global organization. Note that Access Reviews can be performed for an Admin Unit, as the members of the unit will be in a group. By using the step-by-step guide on how to configure access reviews that I stated earlier, this illustrates how the three topics I am reporting on can be used together to enhance security and compliance in an organization.
Best Practices For Effective Administrative Unit Management
Administrative Units are a key feature for managing access and governance in an organization. Use these 10 best practices to ensure an efficient framework that meets your organization’s needs.
- Plan Your Administrative Unit Structure: Align your Administrative Units with your organization’s structure and governance model.
- Use Meaningful Names: Clearly identify Administrative Units with descriptive names.
- Limit Scope: Restrict Administrative Units to specific resources and users.
- Delegate Administration: Assign administrators to manage specific Administrative Units.
- Monitor and Audit: Regularly review and audit Administrative Unit configurations.
- Document Processes: Maintain documentation for future reference and planning.
- Regularly Review Membership: Ensure accurate user and resource membership.
- Test and Validate: Verify Administrative Unit configurations before deployment.
- Integrate with Other Services: Align Administrative Units with other Microsoft services.
- Conduct Access Reviews: Regularly review access for members of an Administrative Unit to reduce security threats and confirm their active status, especially when they transfer to another unit or leave the organization.
With my explanation, I have provided a clear and insightful overview of the benefits of Administrative Units. I have also demonstrated the configuration of an Admin Unit using a scenario and outlined 10 best practices for the effective management of Admin Units.
Privileged Identity Management (PIM)
Privileged Identity Management (PIM) is a Microsoft Entra ID service that helps you manage and secure access to sensitive resources in your organization. This includes resources in Microsoft Entra ID, Azure, Microsoft 365, and other Microsoft online services.
In a nutshell, what PIM helps to achieve is to manage what users with privileged roles (such as Global Admin, Billing Admin, User Admin, and so on) can do in an organization or within a tenant.
Benefits of Privileged Identity Management (PIM)
Here are the top 4 benefits of Privileged Identity Management that help protect an organization’s sensitive resources:
- Restricting access to high-privilege roles (like Global Admin) to only when needed: Only allow users to access sensitive resources when necessary, reducing the risk of unauthorized access.
- Automatically expiring access after a set time: Limit how long users have access to sensitive resources, so even if they forget to log out, their access will end automatically.
- Requiring approval for high-privilege role assignments: Ensure that only authorized users can access sensitive resources by requiring someone to approve their access first.
- Providing real-time alerts and detailed activity logs for monitoring: Get notified immediately if someone tries to access sensitive resources without permission, and keep a record of all activity to track who did what.
Configuration of Privileged Identity Management
To configure PIM in an organization, there are steps to follow. I will use the following scenario to practically configure PIM: BenTech Company has hired two new contractors, Adewumi and Bola, to work as Administrators for a 3-month contract period. Adewumi will be working as a User Administrator, while Bola will be working as a Security Administrator. To ensure that their access to sensitive resources is limited to the duration of their contract and that their privileges are properly managed, BenTech Organization Policy requires me as a Global Administrator to apply Privileged Identity Management (PIM) to both Adewumi and Bola.
Step 1: Signing Into Entra ID Admin Center
- I signed in to the Entra ID Admin center as a Global Administrator, which is the only role that can configure PIM.
- I navigated to “Identity Governance” and clicked on “Privileged Identity Management (PIM)”.
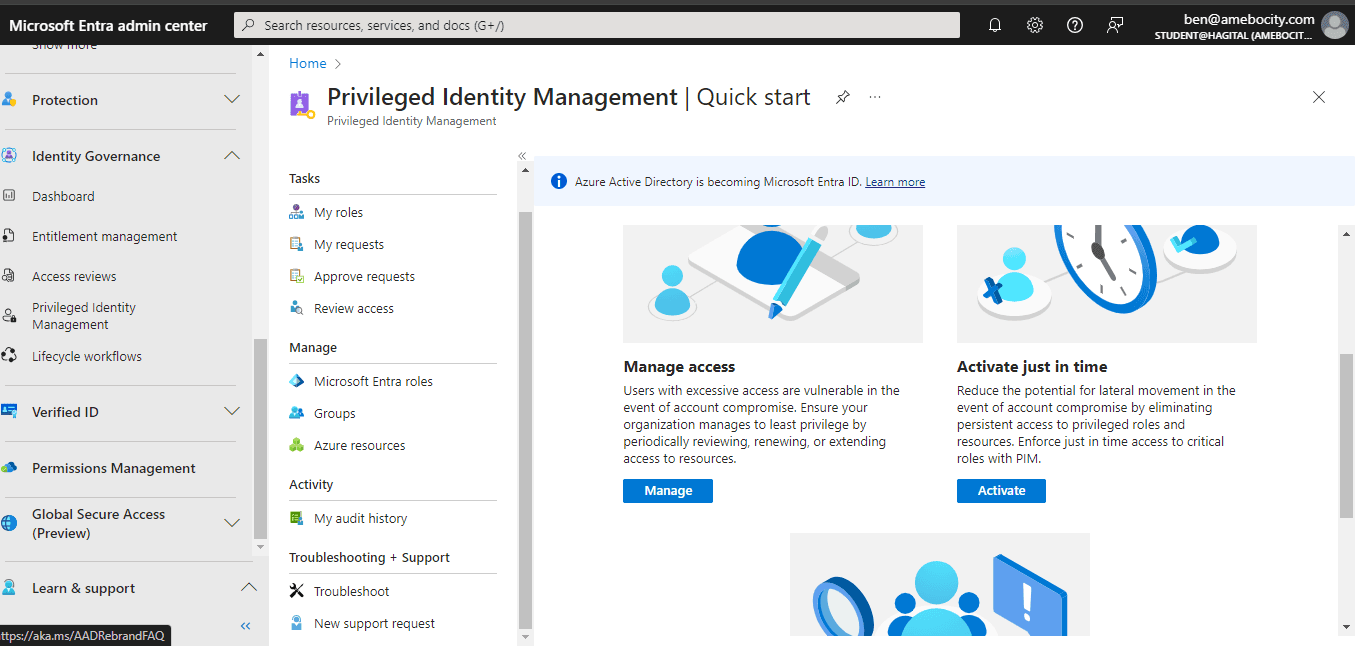
Step 2: Add Adewumi and Bola to PIM
Under PIM, I clicked on “Microsoft Entra roles”, then clicked on “Assign eligibility”. I chose the “User Administrator” role and assigned Adewumi to it. I also selected the “Security Administrator” role and assigned Bola to it.
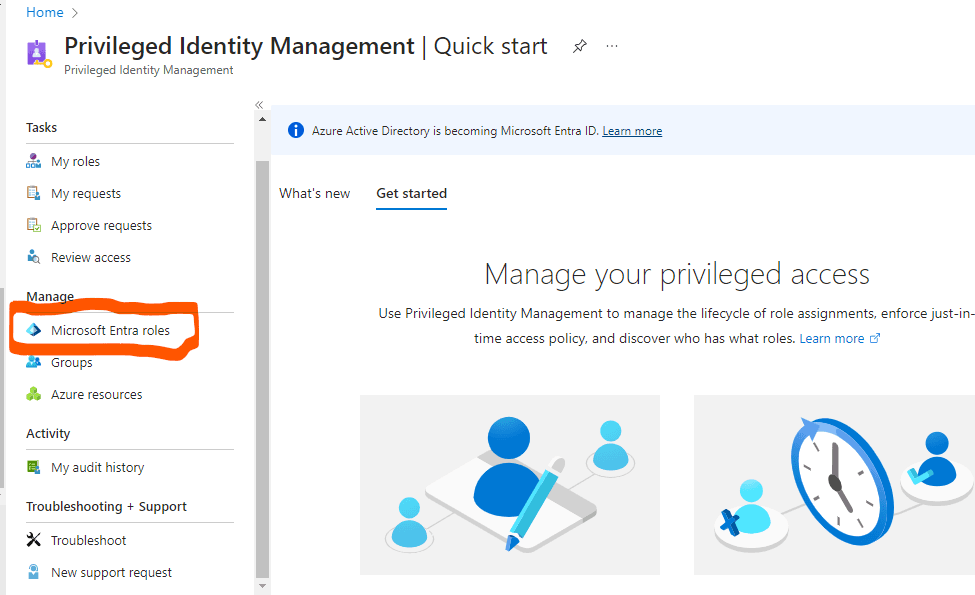
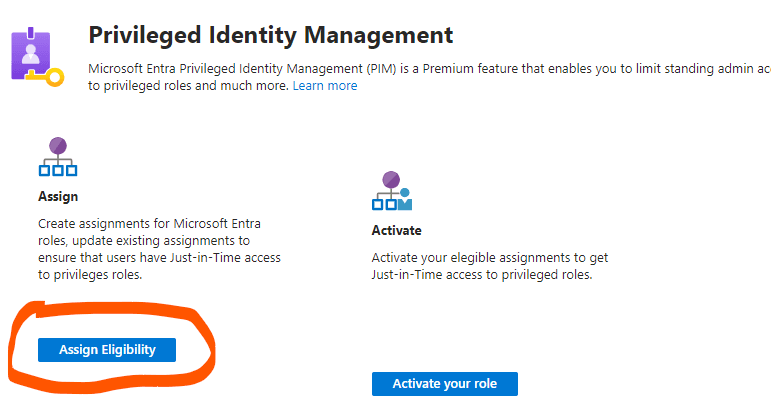


Step 3: Configure Role Settings
I went to “Role settings”, selected “User Administrator” and “Security Administrator”, and configured the following settings:
- Set “Activation maximum duration” to 24 hours
- Set “On activation, require” to “Azure MFA”
- Checked the box for “Require justification on activation”
- Checked the box for “Require approval to activate”
- Selected benjamin as the “Approver”
I then configured the following additional settings for the User Administrator role:
- Set “Expire eligible assignments” to “After 1 year”
- Set “Expire active assignments” to “After 3 months”
- Checked the box for “Require justification on active assignment”
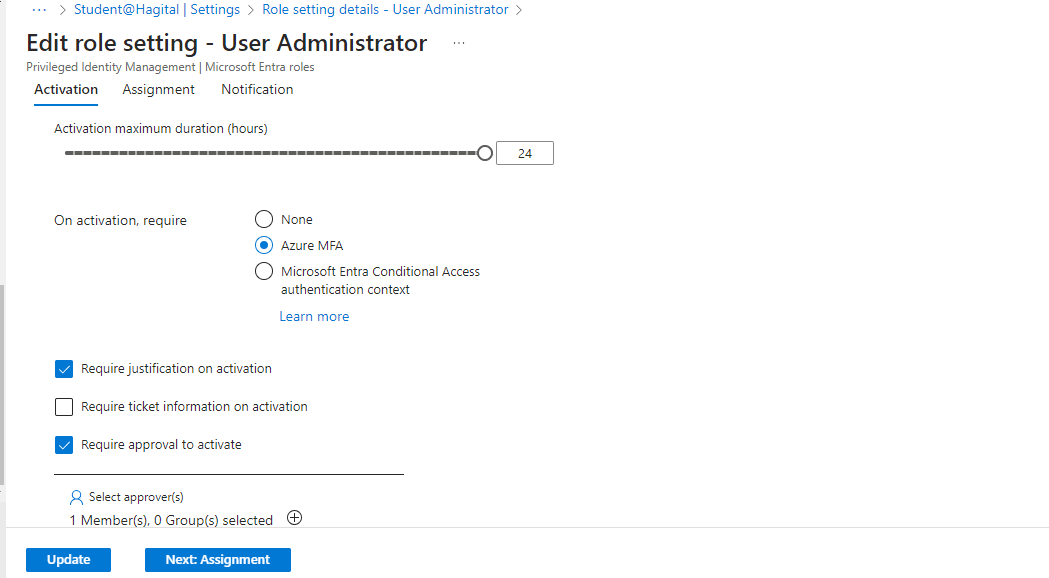
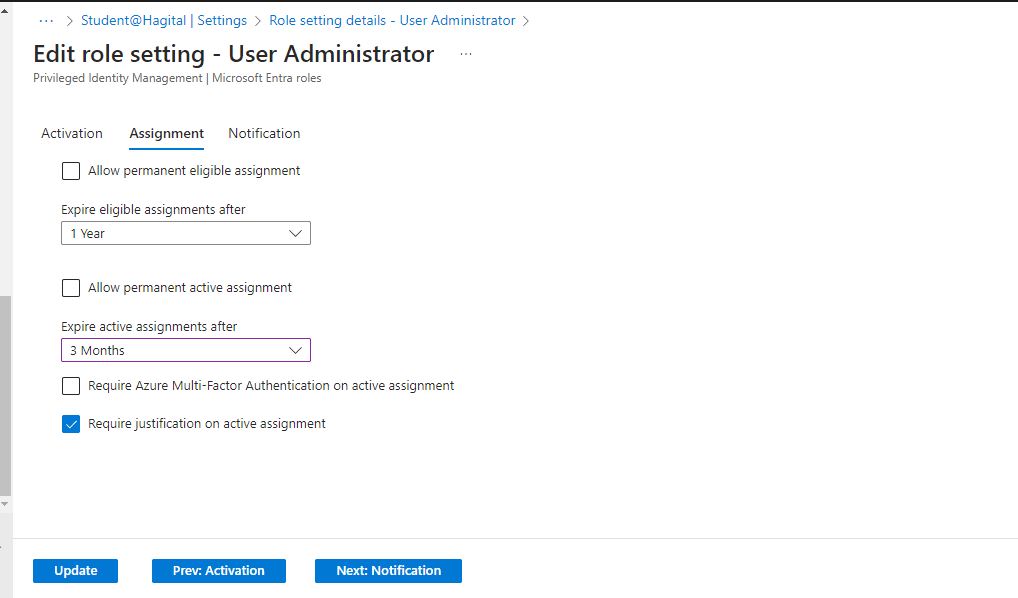
I applied the same edit process to the Security Administrator role as I did for the User Administrator role, configuring the identical settings as shown in the screenshots below.
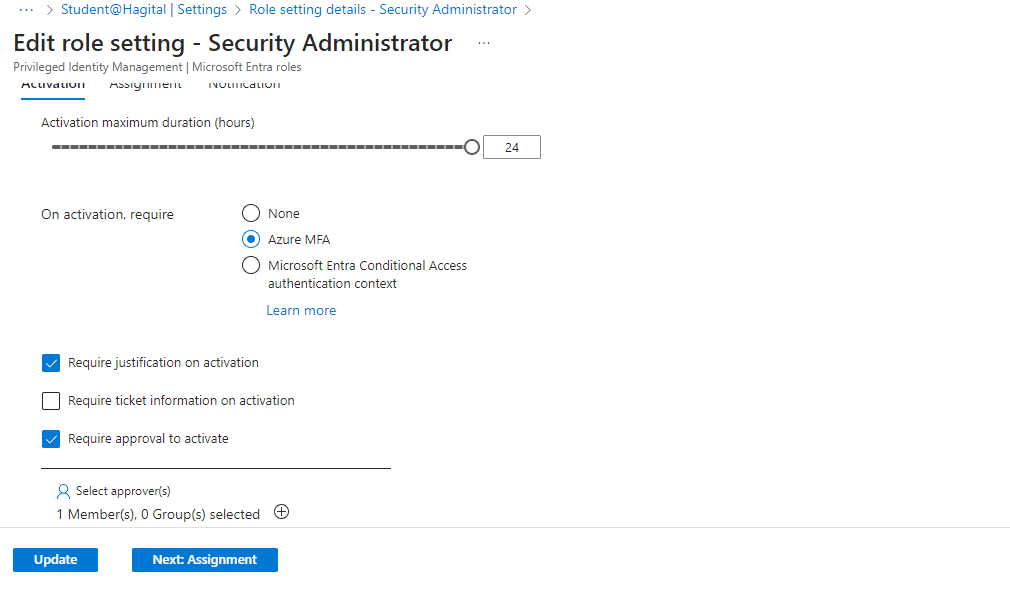
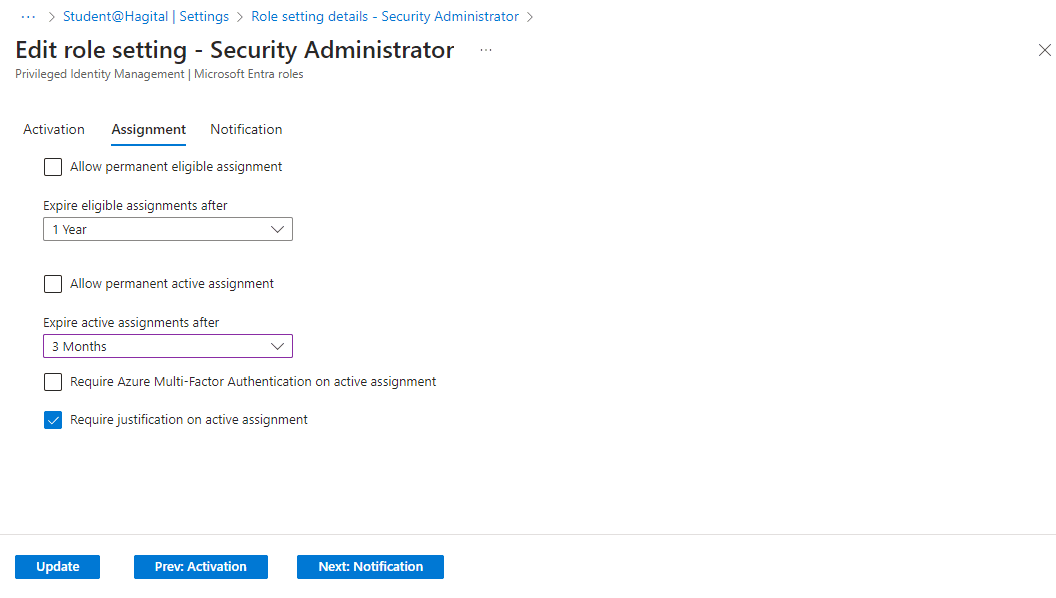
Step 4: Adewumi and Bola log in to their respective Entra ID accounts to activate their assigned roles.
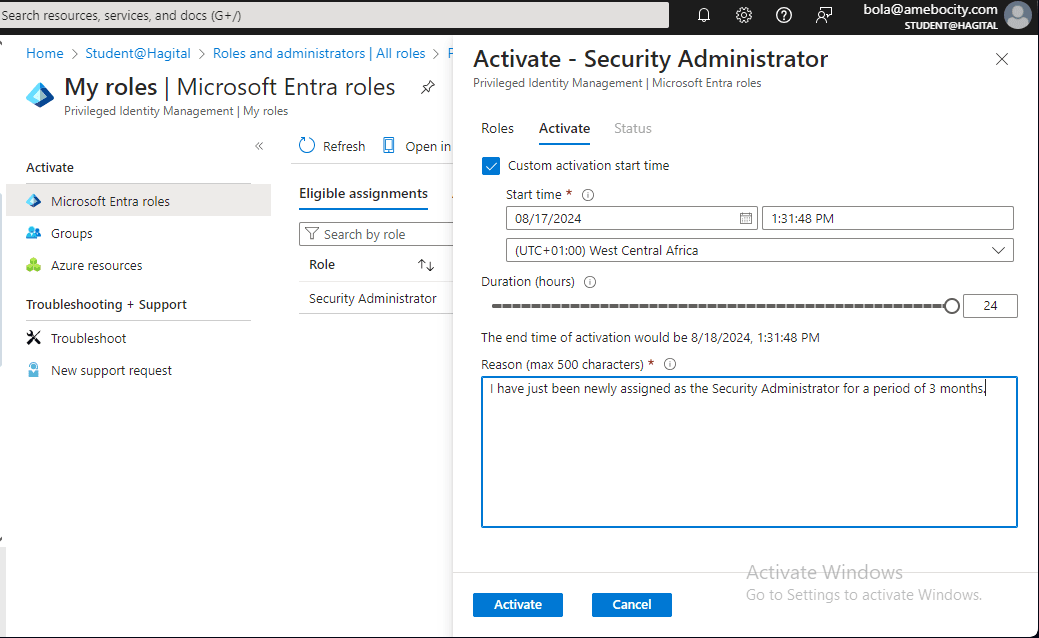
Bola clicks on the “Activate” button and provides a reason: “I have just been newly assigned as the Security Administrator for a period of 3 months.”
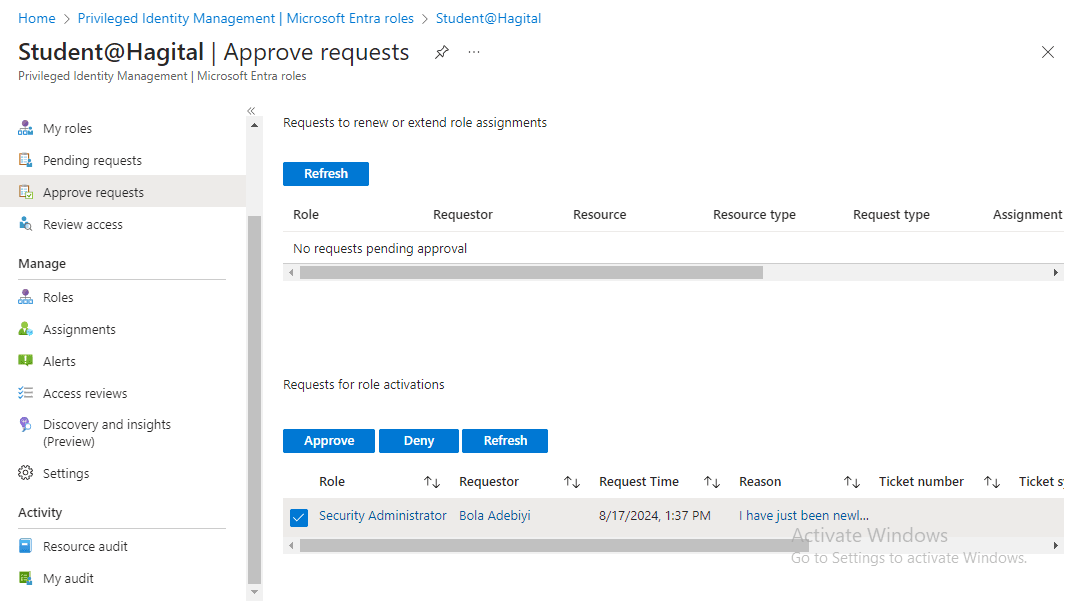
I then log in to the Entra Admin Center to approve Bola’s activation request.
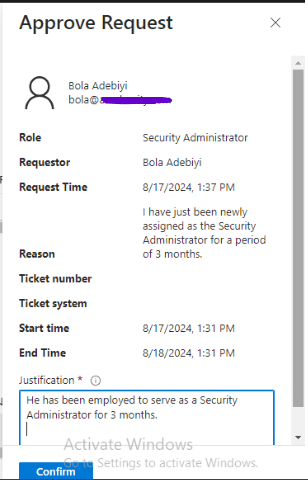

Bola’s role as a Security Administrator is activated.
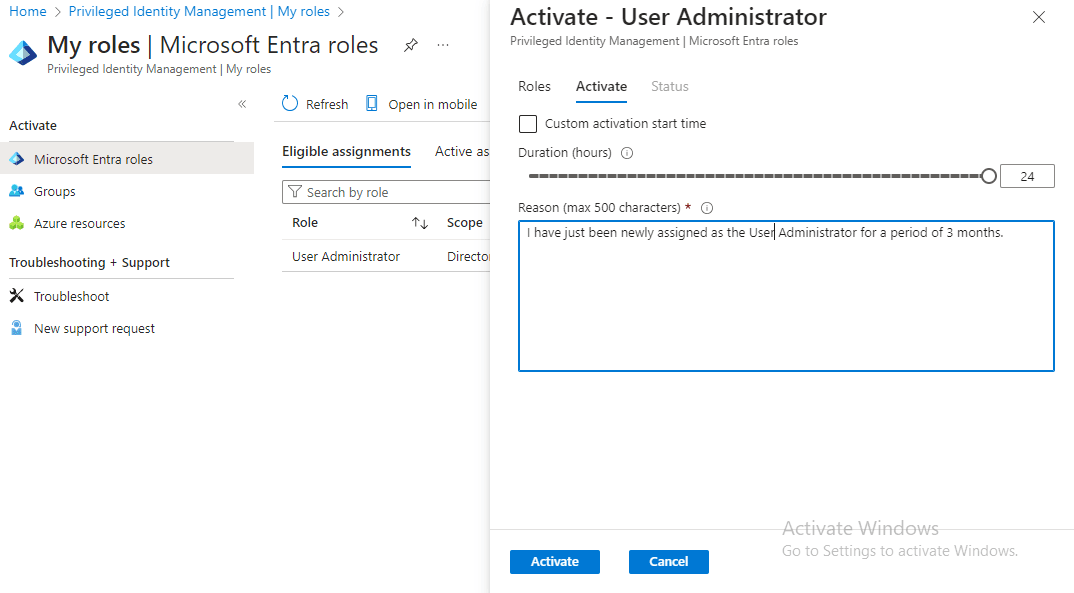
Adewumi also clicks on the “Activate” button and provides a reason: “I have just been newly assigned as the User Administrator for a period of 3 months.”
I then log in to the Entra Admin Center to approve Adewumi’s activation request.
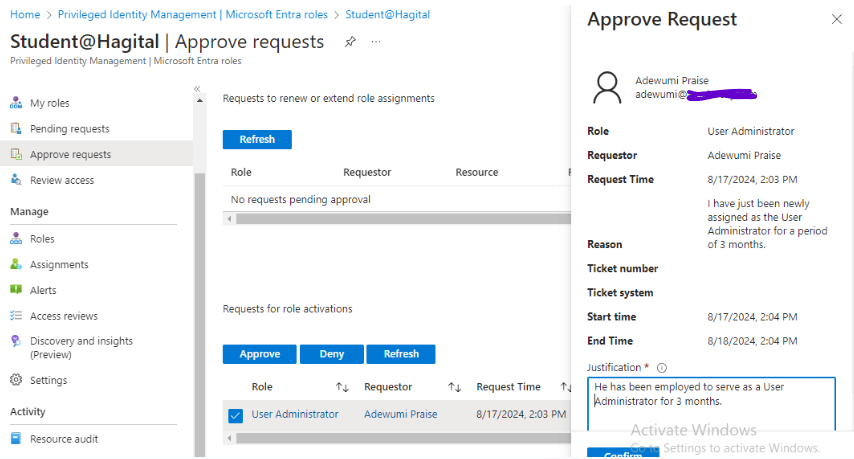

Adewumi’s role as a User Administrator is activated.
Step 5: Configure Access Reviews
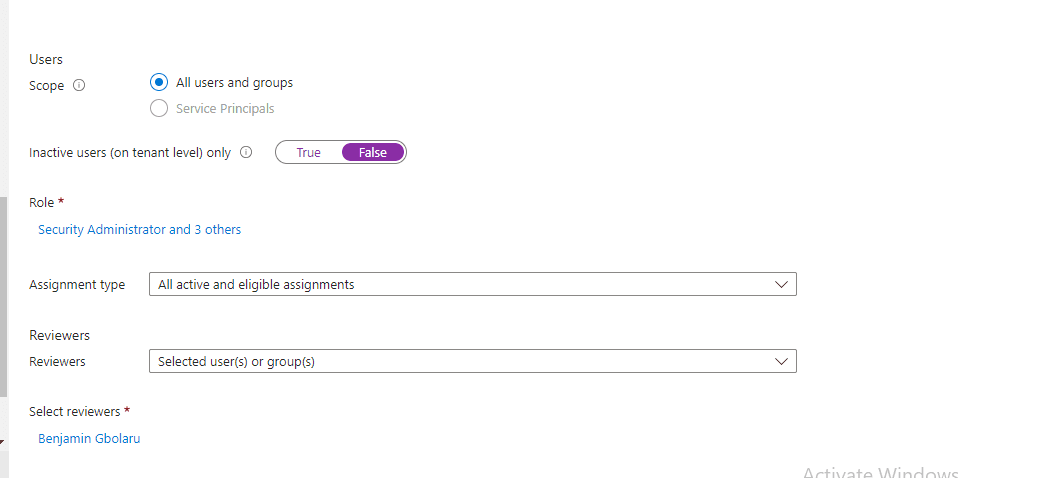
To configure Access Reviews in PIM, on the PIM page, I click on “Microsoft Entra roles”, then I click on “Access reviews”. I then select the most critical privileged roles, such as Global Administrator, User Administrator, Security Administrator, and Global Reader, to review.
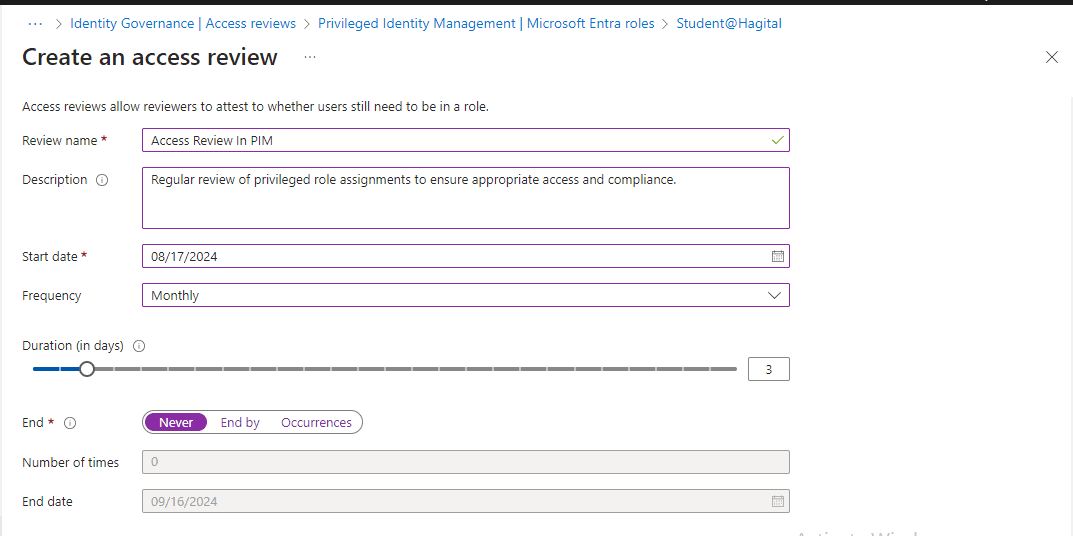
To initiate the Access Review in PIM, I configured the following settings:
- Review Name: Access Review in PIM
- Description: [Regular review of privileged role assignments to ensure appropriate access and compliance.]
- Start Date: August 17, 2024
- Duration: 3 days
- End Date: Never
- Scope: All users and groups
- Assignment Type: All active and eligible assignments
- Reviewer: Benjamin Gbolaru
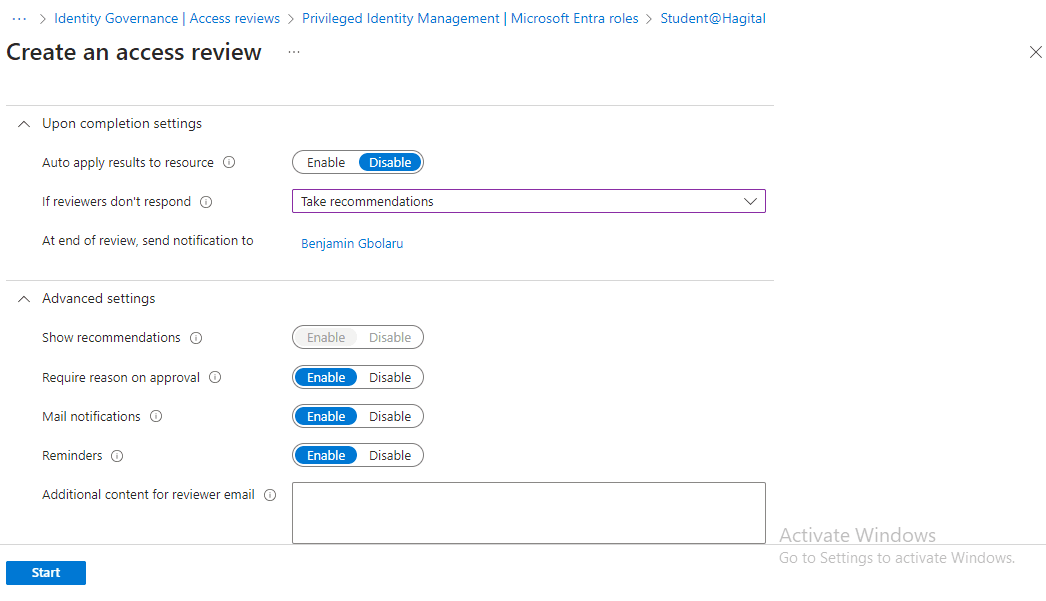
- Auto-apply results to resources: Disabled
- Non-response action: Take recommendation
In the Advanced settings, I enabled:
- Mail notifications if reviewers don’t respond
- Reminders if reviewers don’t respond
- Require reason on approval
With these settings in place, I clicked ‘Start’ to initiate the Access Review process. See Screenshot Below.
Step 6: Initiating Access Review
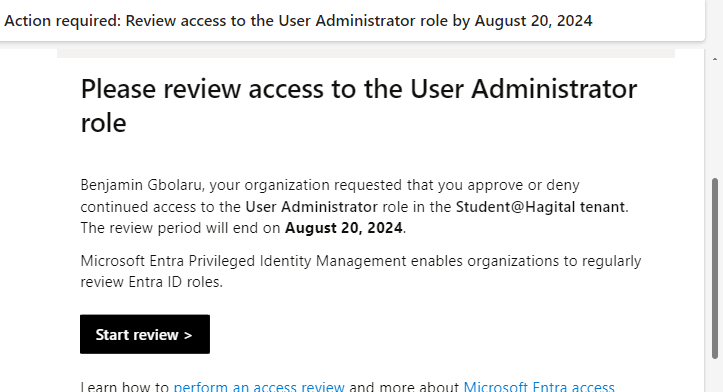
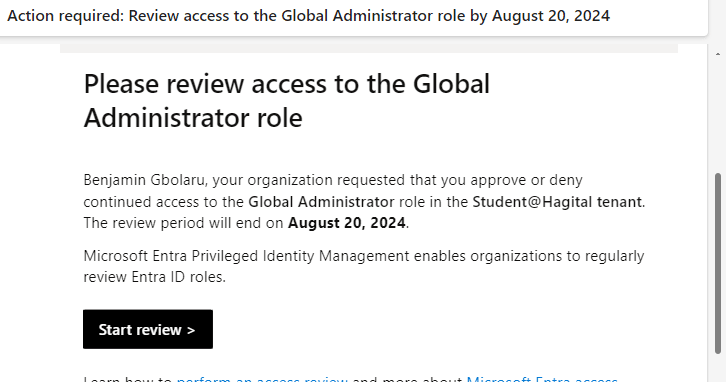
I log in to my Outlook email account and receive an email requesting me to review access to the Security Administrator, User Administrator, and Global Administrator roles. To commence the review, I click on the “Start Review” button.
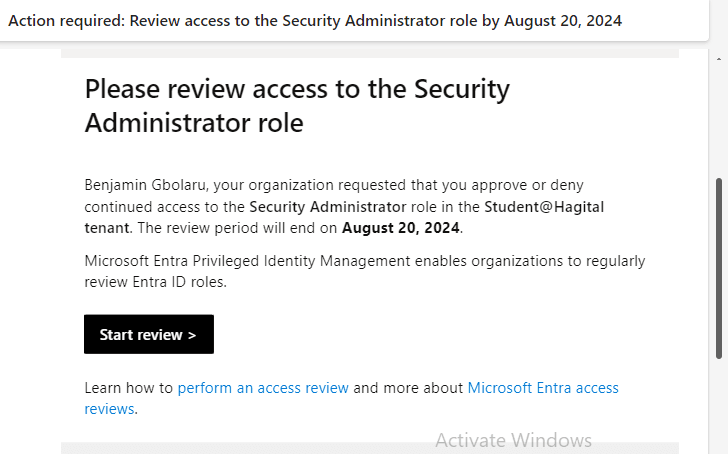
I review Bola’s access as a Security Administrator and follow the recommendation to approve his access.
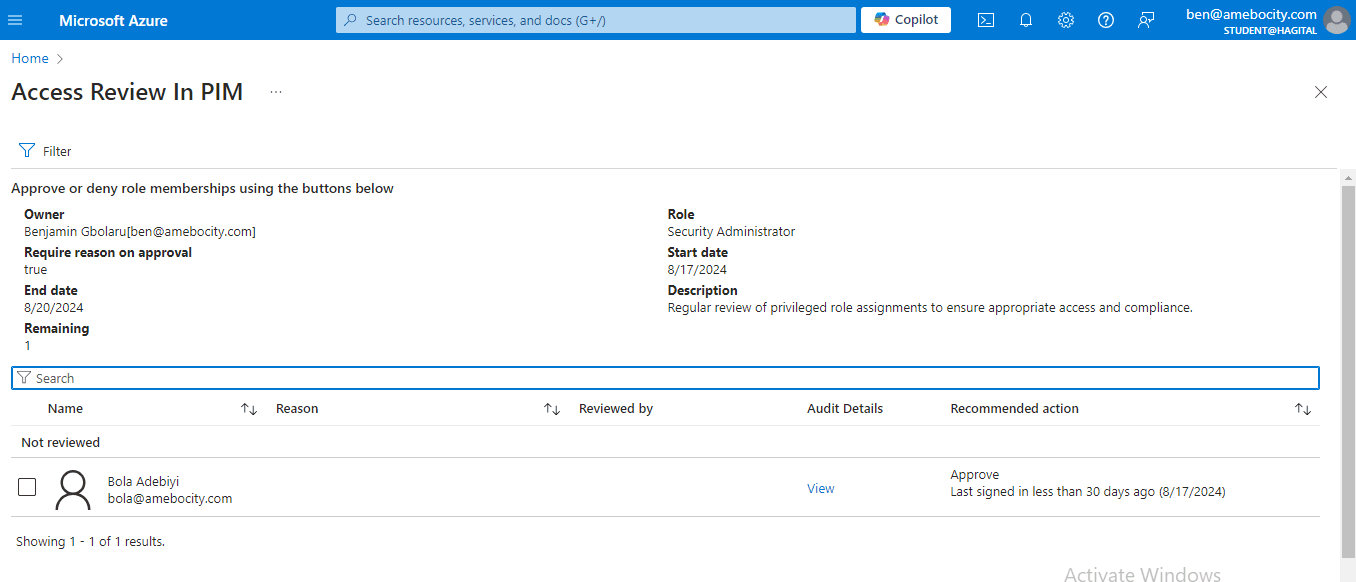

I also review Adewumi’s access as a User Administrator and follow the recommendation to approve his access.
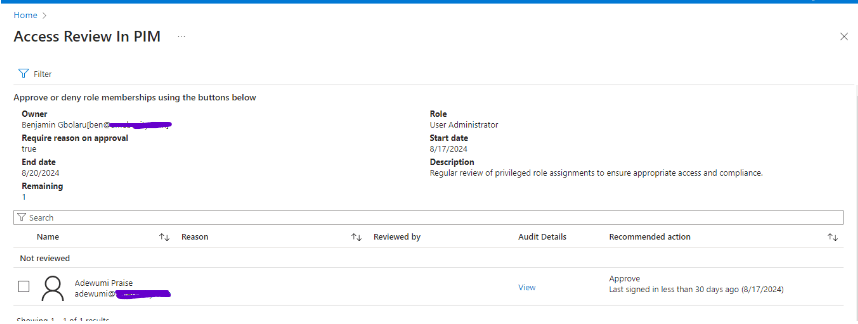

The screenshot below shows how I reviewed access for the Global Administrator role, although it was not part of the initial scenario. However, there are users with the Global Administrator role that require review.
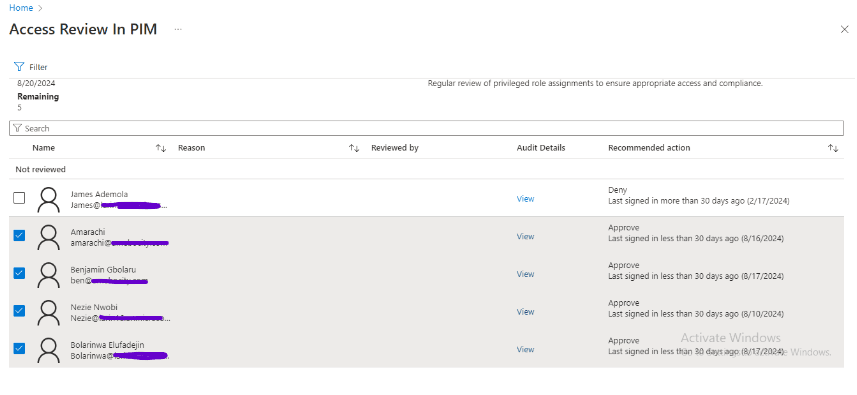

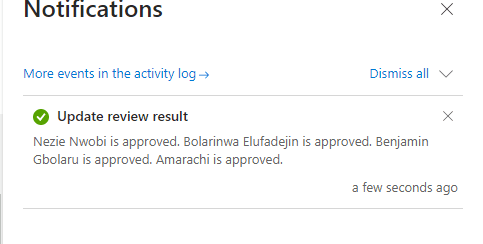
I successfully created an Access Review, initiated the review process, and completed it.
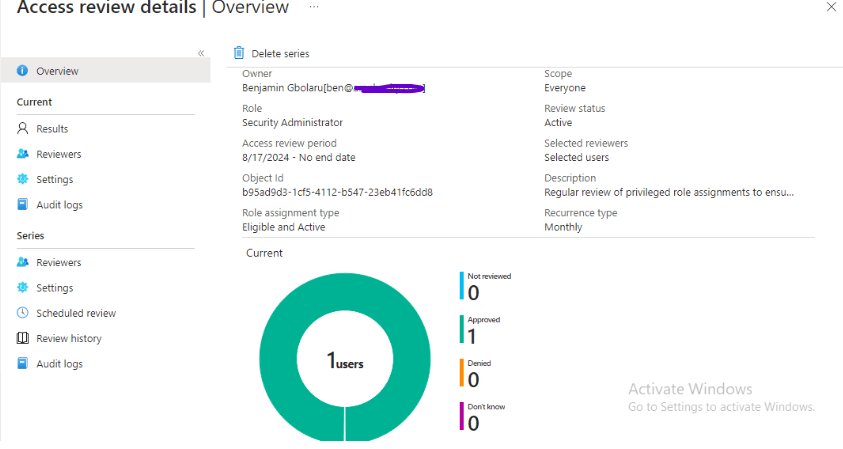
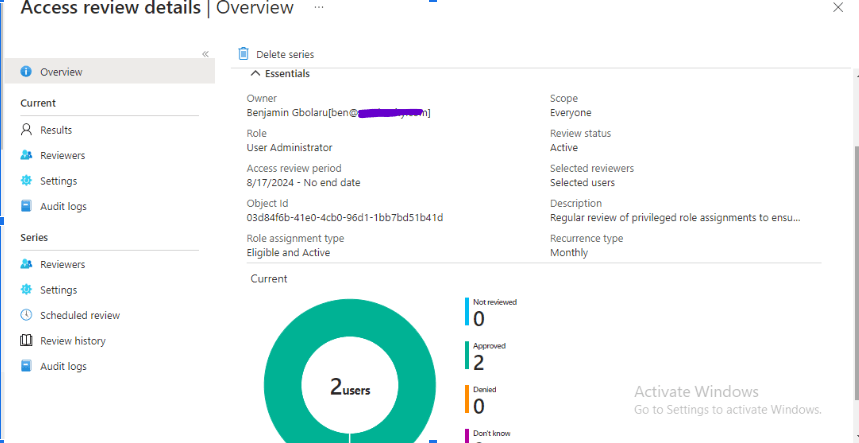
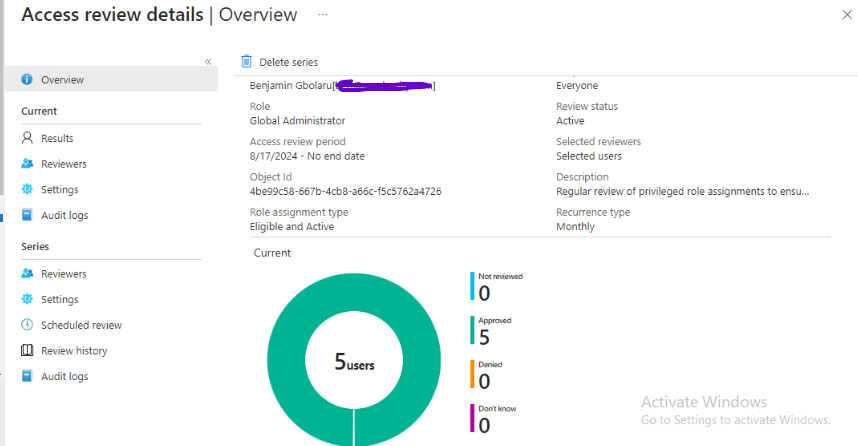
Step 7: Configure Alerts
Inside PIM, I set up necessary alerts in order to stay aware of any potential security risks.
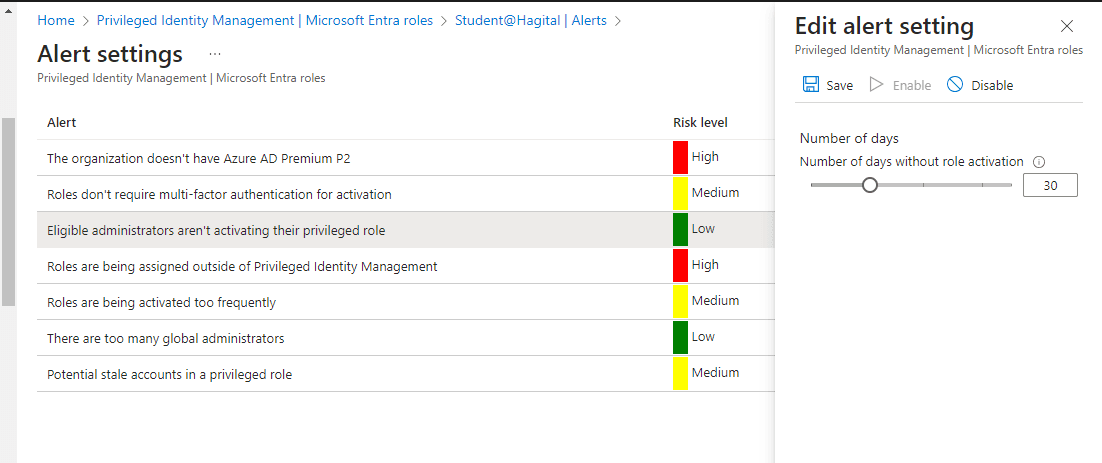
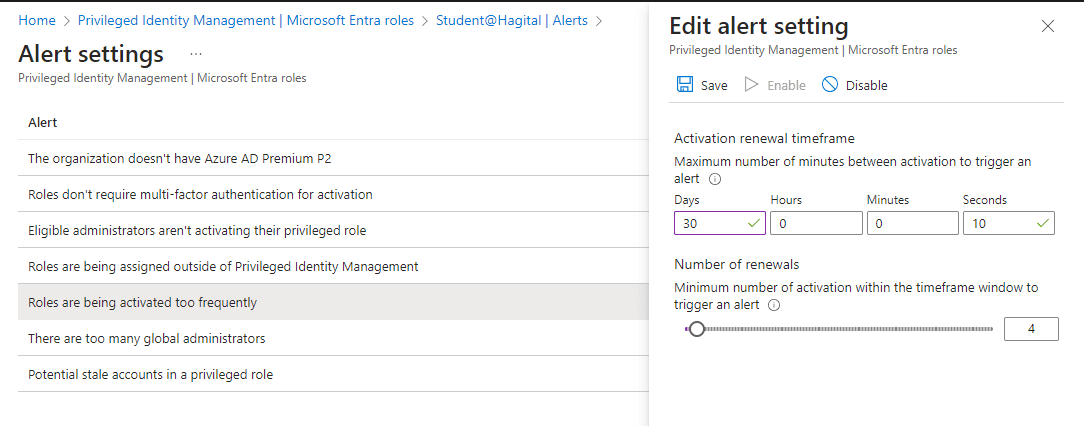
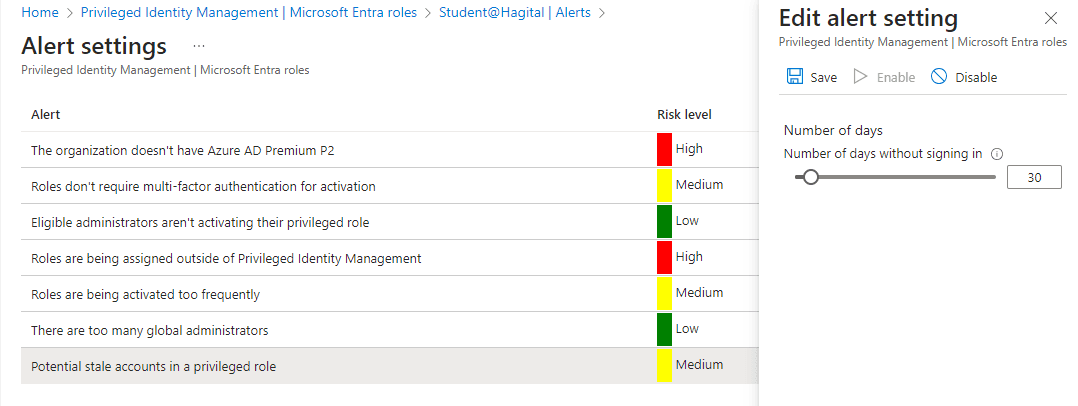
By following these steps, BenTech Organization can ensure that Adewumi, Bola, and other users’ access to privileged roles is secure, limited, and monitored, and that their privileges are revoked automatically at the end of their contract period.
Best Practices for Effective Privileged Identity Management
Here are the top 8 best practices for effective Privileged Identity Management (PIM):
- Define and Classify Privileged Identities: Identify and categorize privileged accounts based on their level of access and sensitivity.
- Implement Least Privilege Access: Grant only necessary privileges to users and applications, limiting their access to sensitive data.
- Use Strong Authentication and Authorization: Enforce multi-factor authentication, smart cards, or biometrics for privileged access.
- Regularly Review and Audit Privileged Access: Periodically review and audit privileged access to ensure compliance and detect anomalies.
- Implement Just-in-Time (JIT) Access: Grant privileged access only when needed and revoke when finished.
- Monitor and Analyze Privileged Activity: Continuously monitor and analyze privileged activity for suspicious behavior and security incidents.
- Document and Train: Document PIM processes and train administrators on best practices, ensuring consistent implementation.
- Continuously Monitor for Vulnerabilities: Regularly scan for vulnerabilities and patch promptly to prevent exploitation by attackers.
By following these top 8 best practices, organizations can effectively manage privileged identities, reduce security risks, and protect sensitive data.
In this report, I have successfully explained the meaning of Privileged Identity Management (PIM) and its advantages. Additionally, I have demonstrated a practical configuration of PIM using a real-world scenario and outlined 8 essential best practices for effective PIM implementation.
Recommendation
I strongly recommend that every organization implements and utilizes Access Reviews, Administrative Units (Admin Units), and Privileged Identity Management (PIM). By doing so, they can:
- Automate Access Reviews to ensure timely and efficient access management
- Establish clear Admin Unit roles and responsibilities for effective delegation and oversight
- Enforce PIM best practices to minimize privileged access risks
- Continuously monitor and audit access and privileges to detect and respond to potential security threats
Implementing these measures will:
- Minimize security risks and vulnerabilities
- Ensure streamlined workflows and efficient processes
- Reduce administrative burdens and overhead
- Foster a well-structured and organized environment, free from access-related issues
By adopting these practices, organizations can significantly enhance their security posture, optimize operations, and maintain a secure and compliant environment.
Final Thoughts
In my report, I have successfully demonstrated the best way to implement Access Reviews, Admin Units, and Privileged Identity Management (PIM) with Microsoft Entra ID. I have provided their benefits, used different scenarios for configurations, stated best practices, and provided recommendations. This report shows that Access Reviews, Admin Units, and PIM are important Entra ID features for effective identity management. By implementing and configuring these features effectively, organizations can significantly enhance their security posture, reduce risk, and improve compliance.
Need expert assistance with Microsoft Entra ID features? Contact Medha Cloud today!
Our team of certified professionals is ready to help your organization configure and optimize Access Reviews, Admin Units, and PIM to strengthen security and ensure compliance. Let Medha Cloud guide you in leveraging these powerful tools in Microsoft Entra ID for effective identity management and a robust security posture.
Topics

Sreenivasa Reddy G
Founder & CEO • 15+ years
Sreenivasa Reddy is the Founder and CEO of Medha Cloud, recognized as "Startup of the Year 2024" by The CEO Magazine. With over 15 years of experience in cloud infrastructure and IT services, he leads the company's vision to deliver enterprise-grade cloud solutions to businesses worldwide.
