A Step-by-Step Guide to Minimal Hybrid Migration for Exchange Online
If your organization is ready to make the switch from an on-premises Exchange environment to Microsoft 365 or Office 365, the minimal hybrid migration also known as express migration—is one effective way to migrate user mailboxes in only a few weeks. This type of migration is best for organizations with an Exchange 2010, 2013, or 2016 server that do not plan on maintaining directory synchronization once the migration is complete.
In this article, I will guide you through a step-by-step minimal hybrid migration process and outline the prerequisites that must be met.
Prerequisites for minimal hybrid migration
Minimal hybrid migration is right for your organization in the following cases:
- Your organization has at least one on-premises Exchange 2010, 2013, or 2016 server.
- Your organization wants to complete the migration to Exchange Online in only a few weeks.
- Your organization does not want to keep directory synchronization running after the migration to manage the users.
Step-by-Step migration process
Step 1: Confirm domain ownership
Before the actual steps are followed regarding the migration, the on-premises domain needs to be verified in Microsoft 365 or Office 365.x
- Log in to Microsoft 365 with your admin credentials.
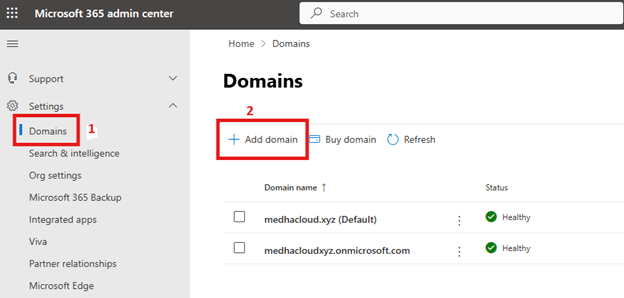
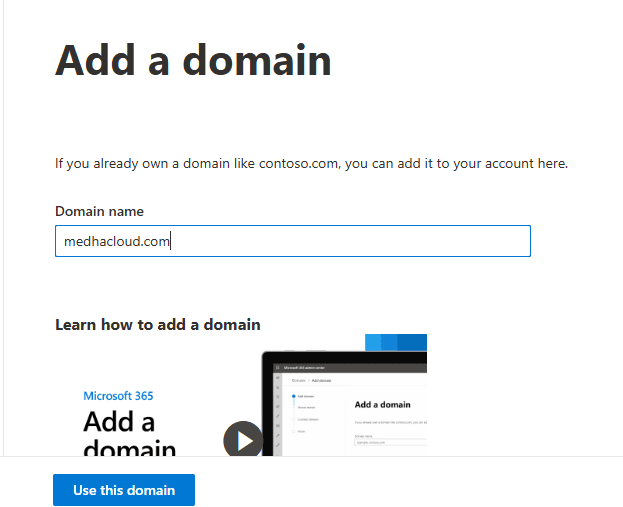
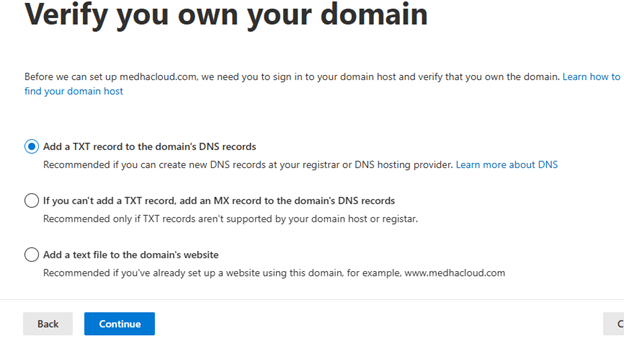
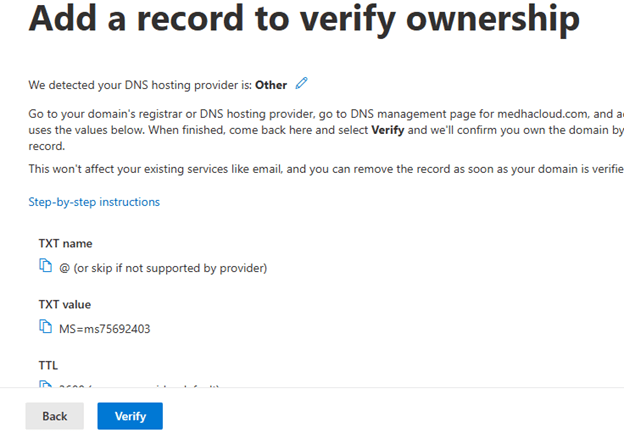
- Go to Settings > Domains and select Add domain. Enter the on-premises domain name, for example, medhacloud.com, and go through the steps in the wizard.
- Create a TXT, CNAME and MX record in your DNS as the provider instructs to verify ownership of the domain. Once verified, you're ready to continue with the email migration.


Step 2: Start express migration
Sign in to your Microsoft 365 account from a computer that's connected to your on-premises domain and open the Microsoft 365 Admin center.
- Go to Setup > Migrations and click on Email.
- On the ‘Migrate your email page’, click Get started.
- Run the Exchange Hybrid Configuration Wizard, which can be downloaded from there.
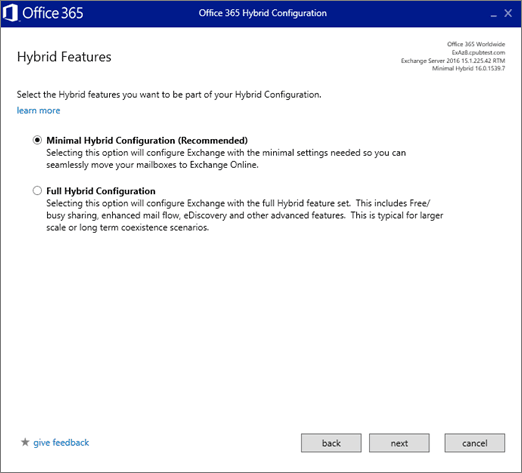
- Connect to an Exchange server, validate credentials, and select Minimal Hybrid Configuration.
- Prepare the on-premises mailboxes for migration by selecting Update.
Step 3: Run one-time directory synchronization
To create the user accounts in Microsoft 365:
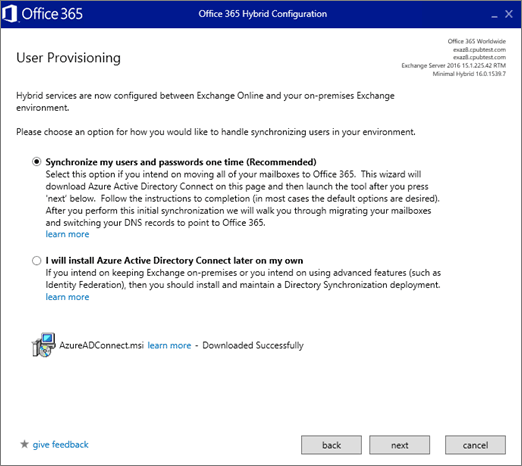
- On the User Provisioning page, click Synchronize my users and passwords one time.
- Download and configure Microsoft Entra Connect using its default settings on the Express page.
When synchronization finishes, directory synchronization for the organization is disabled.
Step 4: Assign licenses to users
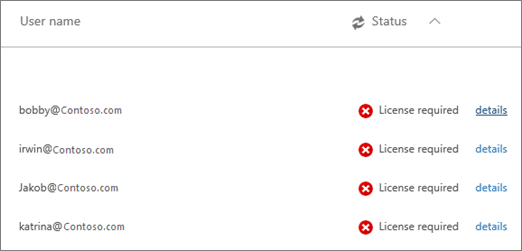
After Microsoft Entra Connect syncs your users and their passwords to Microsoft 365 or Office 365, you need to give them licenses. This will allow them to have a cloud mailbox where their on-premises mailbox data can be moved.
The Data migration page shows that a license is required, as seen in the image.
- In the Admin center, go to Users > Active users.
- Follow the appropriate steps based on the screen for adding licenses one at a time or in bulk.
Step 5: Migrate user mailboxes
Now that the users are licensed, migrate their mailbox data:
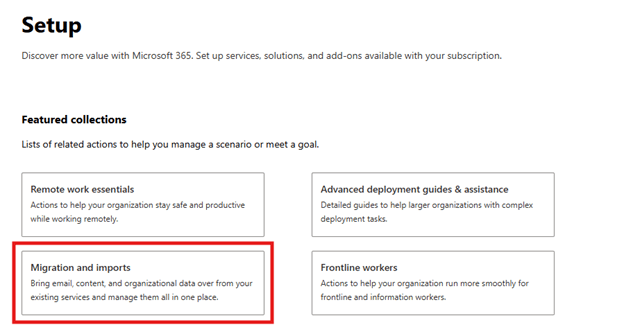
- Go to Setup > Data migration and select Exchange.
- Select users to migrate, followed by migrating them. Testing should be done with a small number of users before migrating all accounts.
Step 6: Update DNS records
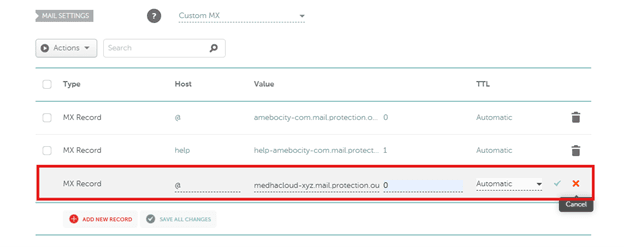
Finally, update your MX record to route mail to Microsoft 365:
- In the Microsoft 365 Admin center, go to Settings > Domains.
- Follow the domains wizard to set up your MX record and other necessary DNS records.

To that end, one can employ a minimal hybrid migration method to effectively achieve user mailbox migration from an on-premises Exchange to Microsoft 365 within the shortest time period. This minimizes the complexity involved in the migration process while keeping all the essential mailbox data and synchronization for users.
Why Choose Medha Cloud for Your Express Migration Needs?
Expertise in Exchange to Microsoft 365 Migration:
Our experienced migration specialists ensure a seamless transition, minimizing downtime and maximizing efficiency.
Tailored Migration Solutions:
We understand that every organization is unique. Our migration plans are customized to meet your specific business needs.
Comprehensive Migration Support:
From domain verification to post-migration setup, our team is with you every step of the way.
Data Integrity and Security:
We employ robust tools and processes to ensure the security of your mailbox data throughout the migration process.
Proven Success:
With a strong track record of successful migrations, Medha Cloud has become a trusted partner for organizations worldwide.
Ready to Simplify Your Migration Process?
Don’t let your migration be a source of stress. With Medha Cloud’s expert guidance, you can ensure a smooth transition to Microsoft 365 while keeping your data secure and accessible.
Get Started with Medha Cloud Today:
- Schedule a Free Consultation:
Our experts will assess your current setup and recommend the best migration plan for your organization. - Request a Personalized Demo:
Experience firsthand how express migration can work for your organization. - Obtain a Custom Quote:
Receive a tailored migration plan aligned with your budget and requirements.
Contact Medha Cloud Today:
- Phone: +91 93536 44646 (India) or +1 646 775 2855 (US)
- Website: medhacloud.com
- Email: info@medhacloud.com
Take the first step toward a secure, and efficient migration to Microsoft 365. Partner with Medha Cloud and experience the peace of mind that comes with working with industry-leading experts in express migration services.
Topics
Bharath Kumar
Senior Microsoft 365 Consultant • 8+ years
Bharath is a Senior Microsoft 365 Consultant specializing in enterprise productivity solutions and white-label IT services. He has successfully deployed Microsoft 365 for over 200 organizations and helps MSPs build scalable white-label partnerships.

