Step-by-Step Guide to Performing a Staged Migration to Exchange Online
One of the major steps for organizations seeking cloud flexibility and scalability is migrating mailboxes from an on-premises Exchange environment to either Microsoft 365 or Office 365. For older Exchange versions (2003 or 2007), a staged migration where mailboxes are moved to Microsoft 365 or Office 365 in batches over time is ideal, as it minimizes disruption to users. This guide walks you through the entire process, from setting up a migration batch to post-migration tasks.
Why staged migration?
For organizations with hundreds or thousands of mailboxes to relocate over time, a staged migration is ideal. It allows for managing user expectations, supporting users as needed, and minimizing the risks of transitioning many users in a short timeframe. The following steps outline each part of setting up, managing, and finalizing a staged migration, helping ensure a smooth transition.
Step 1: Ensure key tasks for a staged Email migration
1. Prepare for a staged migration
- Before you actually migrate your mailboxes, prep your Exchange Server environment.
- Outlook Anywhere: On your Exchange Server, enable Outlook Anywhere (RPC over HTTP) so that Microsoft 365 can connect to it.
- Exchange 2007: Enable Outlook Anywhere
- Exchange 2003: Configure Outlook Anywhere
- Certificate: Use a certificate from a trusted CA. Self-signed certificates are not supported.
- Test Connectivity: Use Outlook externally or test via the Microsoft Exchange Remote Connectivity Analyzer.
- Enable MRS Proxy: Allows the migration service to connect remotely. Learn how to set up MRS Proxy
- Set Permissions: Migration administrator needs FullAccess, WriteProperty, or Receive As permissions to migrate mailboxes.
- Disable Unified Messaging (UM): If UM is enabled, you should disable before migration and re-enable post-migration.
2. Verify domain ownership
Verify your on-premise domain in Microsoft 365. This is critical for the fact that each user's SMTP address will be the basis of their new mailbox in Microsoft 365.
- Verification of ownership should be done through the Domains wizard in Microsoft 365.
- Create a TXT or MX record in your DNS settings and then validate the ownership of the domain.

3. Create users using directory synchronization
Synchronize your on-premise users with Microsoft 365 using the Microsoft Entra Sync Tool or Azure AD Sync. Furthermore, license the users in Microsoft 365 within 30 days after the migration.
4. Prepare the list of mailboxes to migrate
Migration of mailboxes can be controlled through a CSV file containing all the required fields such as EmailAddress, Password, and ForceChangePassword. You can include up to 2,000 mailboxes in one migration batch in the CSV file.
5. Connect Microsoft 365 to your Email system
This step helps you set up migration endpoints that include settings and credentials to connect Microsoft 365 to your on-premises Exchange server.
- Create a migration endpoint: To configure a migration endpoint, you can either Use the Classic Exchange Admin Center or New Exchange Admin Center.

Once created, the migration batch will display on the migration dashboard in the Exchange Admin Center.
Step 2: Creating & starting the migration batch
To Manually start the migration batch, login to the Exchange Admin Center:
- Using the new Exchange admin center: Navigate to Migration > Batch, Name the migration batch, select the path and click Next to configure other settings and to Start the Migration.
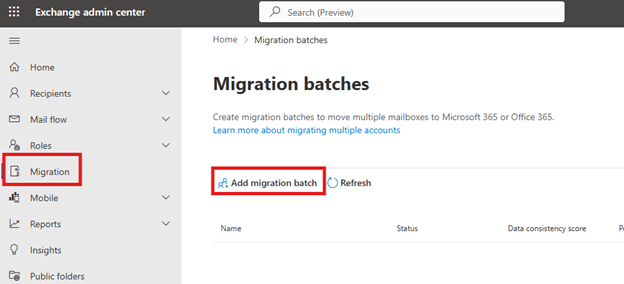
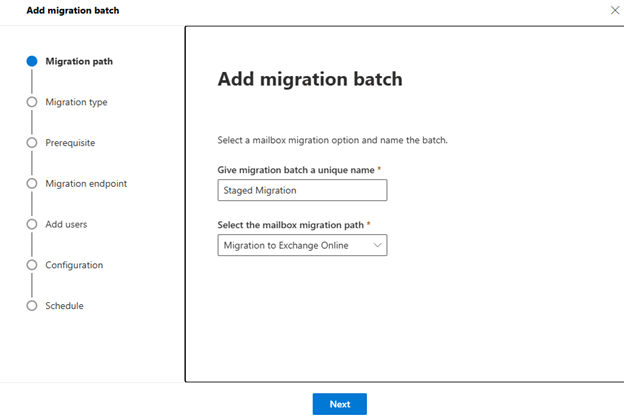
- Using the Classic Exchange admin center: Go to Recipients > Migration, select the batch, and click Start.
Once successfully started, the batch will show a "Syncing" status on the dashboard, indicating data migration from on-premises to the cloud has begun.
Step 3: Tracking the progress
The migration dashboard provides real-time sync status for migration batches. If issues arise, you can view a log file with error details and troubleshooting information. As mailboxes are created in the Microsoft 365 Admin Center, you can confirm accounts are successfully migrating to the cloud.
Step 4: Converting On-Premises mailboxes to mail-enabled Users
After a migration batch completes, users will have both an on-premises and a Microsoft 365 mailbox, but only the Microsoft 365 mailbox receives new mail. To avoid confusion, convert on-premises mailboxes to mail-enabled users, which:
- Redirects users to Microsoft 365 for Email: Ensures users access only their Microsoft 365 mailbox.
- Retains proxy addresses: Supports cloud-based management from Active Directory, helpful if planning to decommission the on-premises Exchange environment.
Scripts are available to facilitate this conversion for Exchange 2003 and Exchange 2007 mailboxes.
Step 5: Run multiple batches
Migrate batches all at once or one after another, depending on your resources and timeline. Each batch supports a maximum of 2,000 mailboxes, so plan according to your IT team’s capacity to support users moving to the cloud.
Step 6: Minimizing Email delays through DNS adjustments
Ensure smooth email delivery to Microsoft 365 mailboxes by updating DNS settings during migration:
- Lower TTL: Before migration, reduce DNS Time to Live (TTL) to around 3,600 seconds or less. This allows external email systems to frequently check for MX record location changes, reducing delivery delays.
- Change the MX record: After migration, update the MX record to point to Microsoft 365 so all new emails route to Microsoft 365 mailboxes. Follow your DNS provider's instructions to update MX records, and allow up to 72 hours for changes to propagate.
Step 7: Finalize the migration – remove the migration batch
Once email is routing correctly to Microsoft 365, delete completed migration batches:
- New Exchange admin center: Go to Migration > Batch, select the batch, and choose Delete.
- Classic Exchange admin center: Go to Recipients > Migration, highlight the batch, and select Delete.
Deleting the batch removes it from the dashboard and performs system housekeeping.
Step 8: Performing post-migration tasks
To complete the migration, perform these final tasks for seamless access to cloud-based mailboxes:
- License users: Assign licenses to migrated users within 30 days to prevent mailbox deactivation.
- Create an Autodiscover DNS record: Set up an Autodiscover CNAME record, such as autodiscover.outlook.com, to enable Outlook and mobile clients to connect seamlessly to the new mailboxes.
- Decommission On-Premises exchange servers: After successful migration and email redirection, consult Microsoft Support before decommissioning on-premises servers to avoid potential issues.
Conclusion
By following these steps, your organization can migrate from an on-premises Exchange environment to Microsoft 365 or Office 365 with minimal disruption. A staged migration offers flexibility for IT teams to manage each phase, monitor progress, and resolve issues, ensuring a smooth transition to a cloud-first environment.
Topics
Bharath Kumar
Senior Microsoft 365 Consultant • 8+ years
Bharath is a Senior Microsoft 365 Consultant specializing in enterprise productivity solutions and white-label IT services. He has successfully deployed Microsoft 365 for over 200 organizations and helps MSPs build scalable white-label partnerships.
