Comprehensive Guide to Performing a Cutover Migration from Exchange to Microsoft 365
Migration of an organization's email system from an on-premises Exchange environment to Microsoft 365 or Office 365 is generally strategic in nature but improves collaboration, scalability, and access to cloud services. A cutover migration involves a complete and immediate switchover to the Microsoft 365 email system. This guide will provide a step-by-step process for a successful migration.
Cutover migration – Important considerations
Migrating Exchange 2003 or later to Microsoft 365 or Office 365 requires domain ownership verification, configuration of Outlook Anywhere, and permissions granted by the user. The users need to change their desktops to an environment where they can have access to Microsoft 365. After migration, the MX records must be updated and licenses allocated. Decommissioning Exchange servers is optional but needs great caution against disruptions.
So Select Cutover Migration if:
- Your on-premises Exchange environment is Exchange Server 2003 or later.
- You have less than 2,000 mailboxes (recommended for 150 or fewer users because of time constraints).
Step-by-Step migration process
Step 1: Planning the migration
- Email Migration Scope: Migration of all email users to Microsoft 365, and the management of their accounts directly in the new environment.
- Domain Requirement: The primary domain in use with your on-premises Exchange must be verified to be owned by your Microsoft 365 organization.
Step 2: Impact to users
- Desktop Updates: Ensure desktop computers are configured for use with Microsoft 365 so that local user credentials synchronize with Microsoft 365.
- Email Routing Delays: Until the MX record is updated, email may still route to on-premises mailboxes.
Step 3: Set up your environment
- Verify Domain Ownership: Verify ownership of the domain associated with your on-premises Exchange in Microsoft 365. This is essential for assigning users email addresses in Microsoft 365.
- Configure Outlook Anywhere: Configure Outlook Anywhere (RPC over HTTP) on your Exchange Server so that Microsoft 365 can connect.
- Certificate Requirement: Use a trusted CA certificate and ensure that the Outlook Anywhere and Autodiscover services are included.
- Enable MRSProxy: Enable MRSProxy on your on-premises Exchange in order to allow mailbox migration.
- Assign Permissions: The migration administrator should have FullAccess or Receive As permissions to each mailbox being migrated.
- Confirm visibility and group settings:
- Ensure mailboxes are not obscured from address lists.
- Create empty mail-enabled security groups in Microsoft 365, if needed.
Migration Steps
Step 4: Create the migration endpoint
- The migration endpoint is the bridge between Microsoft 365 and the on-prem server.
- Navigate: Go to Exchange Admin Center > Migration > Endpoints > Add New.Choose migration type: Select Outlook Anywhere.Connection details: Administrator credentials and email address of a test mailbox to validate the connectivity.
- Test connectivity: Use the Test-MigrationServerAvailability cmdlet in PowerShell to test if the endpoint is available.
Step 5: Create and start the cutover migration batch
- Start Migration Batch: Go to Exchange Admin Center > Migration > Add Migration Batch.
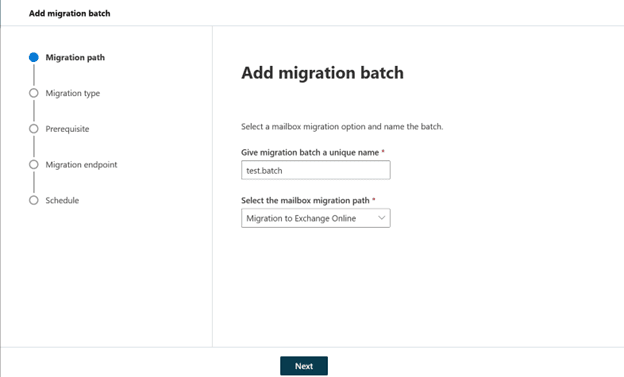
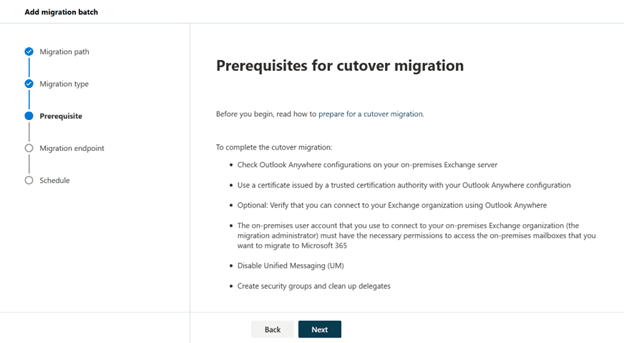
- Select migration type: Select Cutover Migration click next and go through the prerequisites for cutover migration, and select Next again.
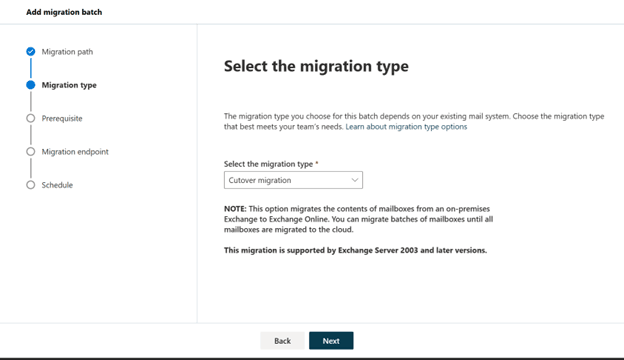
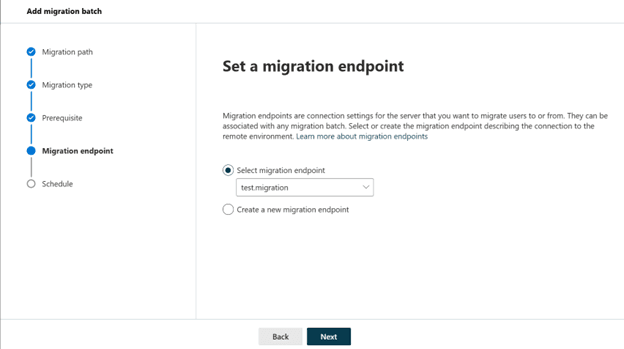
- Endpoint configuration: Choose the migration endpoint that was created in Step 4 from the dropdown.
- Scheduled batch: You can start the migration batch immediately, manually at a later time, or automatically at a scheduled time. It can also be set to automatic or manual, as needed, for completion.
Step 6: Validate and monitor migration
- Monitor the migration progress in the Exchange Admin Center. Verify that:
- Users are provisioned in Microsoft 365 as part of the migration.
- The migration status automatically changes from Syncing to Synced.
Step 7: Update MX records
- Lower TTL setting: Before switching the MX record, set TTL to 3,600 seconds or less on your DNS server to minimize delays.
- Change MX record: The MX record is updated to point to Microsoft 365, so emails are routed directly to the cloud environment.
- Wait 72 hours: Allow time for DNS propagation.
Step 8: Complete the migration
- After MX record changes, verify that all emails are routing to Microsoft 365 and then delete the migration batch in the Exchange Admin Center.
- Delete Migration Batch: Go to Exchange Admin Center > Migration, select the batch, and then delete it in order to clear the migration records.
Step 9: Assign licenses to users
- Assign licenses to enable user accounts in Microsoft 365. If a license is not assigned, accounts will be disabled after a 30-day grace period.
Post-migration tasks
- Autodiscover DNS record: Configure an Autodiscover DNS record to allow for seamless connectivity to mailboxes in Outlook and mobile devices.
- For instance, create autodiscover.<domain> pointing to autodiscover.outlook.com.
- Decommission On-Premises exchange: Post-migration, if no longer needed, remove Exchange and decommission the on-premises infrastructure. Contact Microsoft Support to prevent the accidental results of decommissioning.
Additional notes
- Important ports: When migrating from Exchange 2003, open TCP ports 6001, 6002, and 6004.
- Directory synchronization: If directory synchronization is enabled, disable it before a cutover migration.
- Unified messaging: UM must be disabled on the mailboxes before migration.
Following these steps, you can perform a cutover migration from an on-premises Exchange server to Microsoft 365 without any problems. The whole transition enhances the productivity of the organization by enabling Microsoft 365's rich cloud-based email and collaboration.
Topics
Bharath Kumar
Senior Microsoft 365 Consultant • 8+ years
Bharath is a Senior Microsoft 365 Consultant specializing in enterprise productivity solutions and white-label IT services. He has successfully deployed Microsoft 365 for over 200 organizations and helps MSPs build scalable white-label partnerships.

